How to generate an OpenAPI document with ElysiaJS
ElysiaJS is an amazing modern Web/API framework which puts OpenAPI as a first-class feature, not something that has been tacked on as an afterthought. Let’s take a look at how OpenAPI fits in with usual API development flows in Elysia, how to customize the generated OpenAPI document, and how to use Speakeasy to create an SDK based on the generated document.
First of all, what is OpenAPI and how does it fit in? OpenAPI is a specification for describing REST APIs. It allows you to define your API endpoints, request and response formats, authentication methods, and more in a standardized format. This standardized format can then be used to generate documentation, SDKs, and even test cases for your API.
Some folks create all the OpenAPI descriptions before writing any code, which can be an incredibly powerful workflow known as the API Design-first Workflow. Everyone can agree on “the contract” before any code is written (or generated automatically), and the OpenAPI document can be used as a source of truth for both frontend and backend teams. However, it’s not the only workflow. With Elysia, you can write your API code and OpenAPI documentation in parallel, and the OpenAPI plugin will generate an OpenAPI document based on your code and the metadata you provide in your route definitions. This makes more sense for smaller teams and companies that need a more agile approach.
The plan
Here is how this guide is going to help you turn your Elysia API into a well-documented, SDK-accessible API with OpenAPI and Speakeasy:
- Automatically generate beautiful modern API reference documentation using Scalar UI via the Elysia OpenAPI plugin.
- Improve the OpenAPI document to prepare it for code generation.
- Use the Speakeasy CLI to generate an SDK based on the OpenAPI document.
- Add a Speakeasy OpenAPI extension to improve the generated SDK.
Your Elysia project might not be as simple as our example app, but the steps below should translate well to any Elysia project.
Requirements
This guide assumes that you have an existing Elysia app and basic familiarity with Elysia.
Example repository
If you don’t have an Elysia app or if you want to follow the guide step by
step, you can clone the Speakeasy examples
repo and cd frameworks-elysia to access the
example code used in this tutorial.
The following should be installed on your machine:
- Bun : The Node.js alternative that Elysia is built on.
- Speakeasy CLI : The tool you’ll use to generate an SDK from the OpenAPI document.
Adding the OpenAPI plugin to an Elysia project
First, install the OpenAPI plugin:
bun add @elysia/openapiThen import the plugin, and register it by passing in an instance of openapi to the use() method and chaining the use() method to the Elysia instance:
// !mark
import { openapi } from "@elysia/openapi";
import { Elysia } from "elysia";
import { stationsController } from "./controllers/stations";
import { tripsController } from "./controllers/trips";
import { bookingsController } from "./controllers/bookings";

const app = new Elysia()
  .use(stationsController)
  .use(tripsController)
  .use(bookingsController)
  // !mark
  .use(openapi())
  .listen(3000);
In Elysia, a plugin is a reusable component. In fact, everything in Elysia is a component, including Elysia instances, plugins, routers, stores, and more. Components split apps into small pieces, making it easier to add, remove, or modify app features. It’s important that we use method chaining for type inference in our Elysia code.
Run the Bun development server with bun run dev and open http://localhost:3000/openapi to see the Scalar UI with five API endpoints:
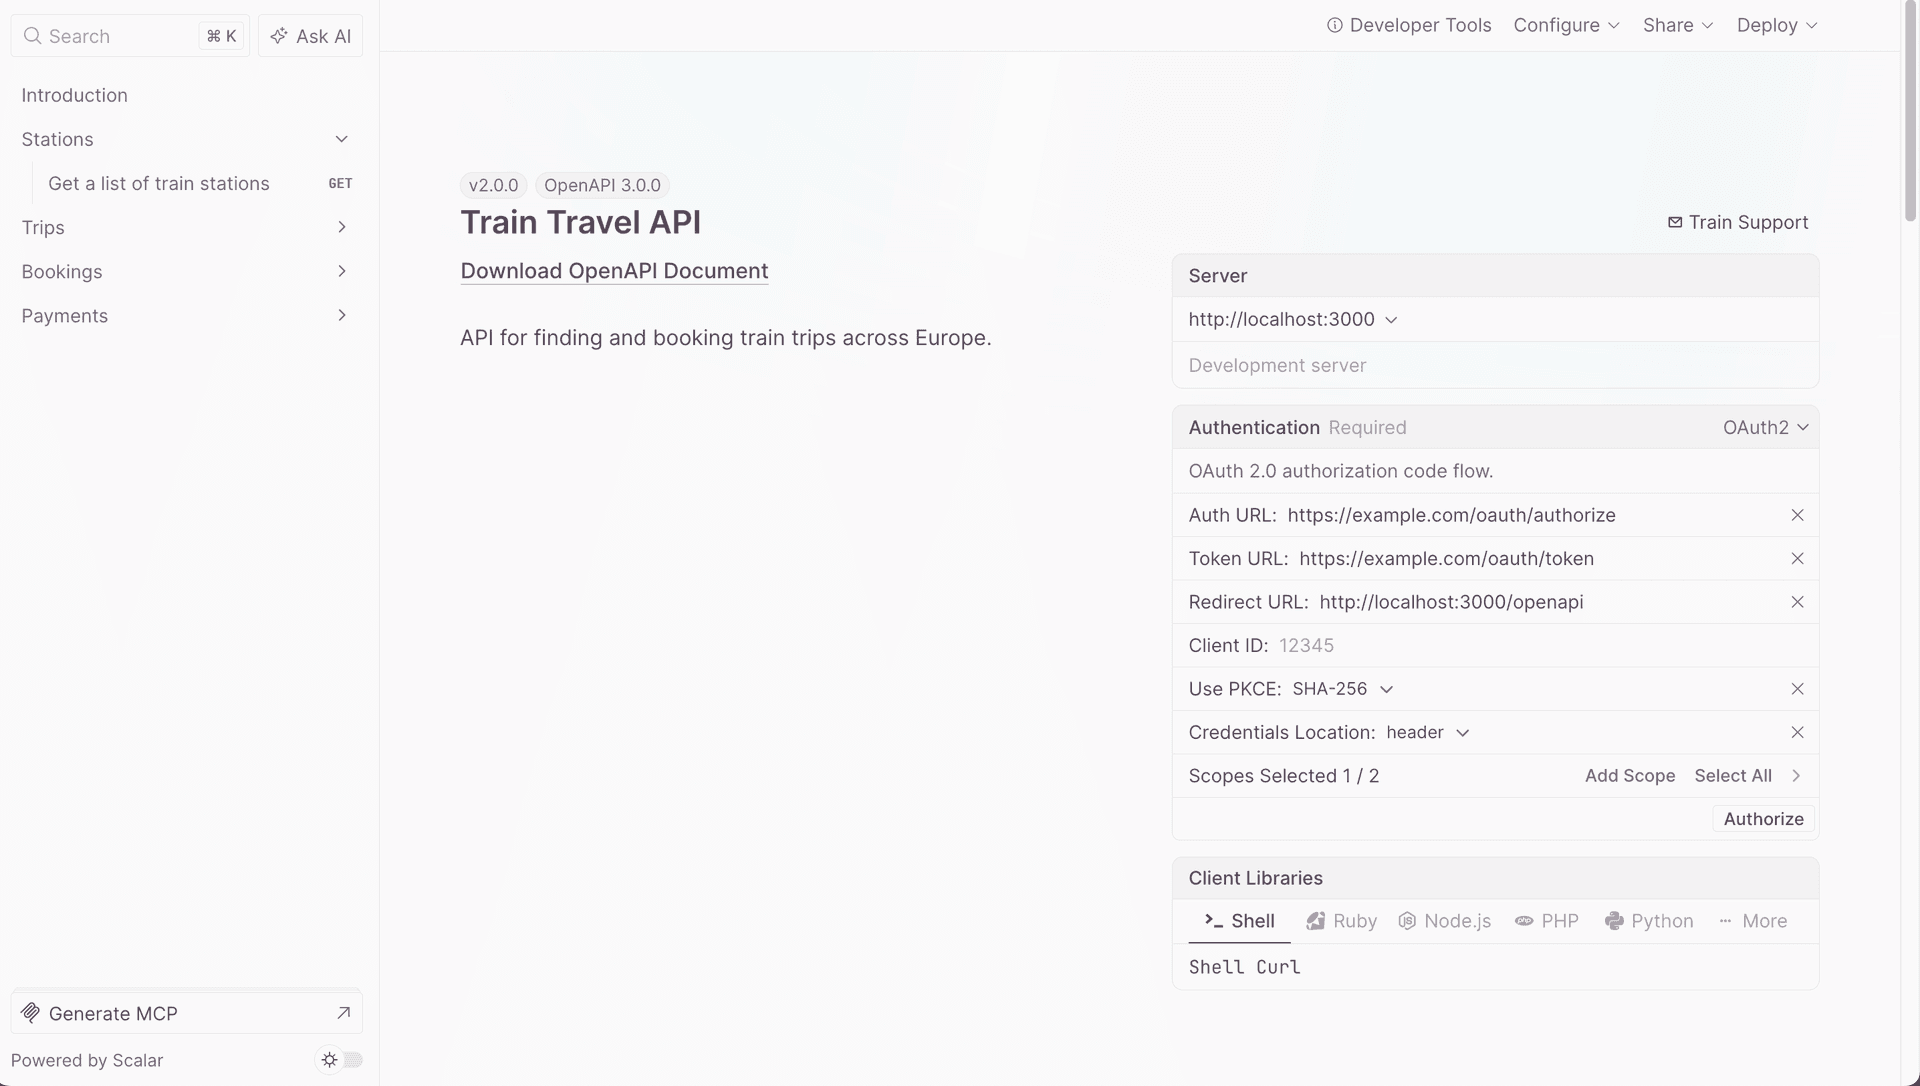
The API routes are listed in the navigation pane on the left. Click /bookings GET to navigate to one of the Train Travel resource endpoints:
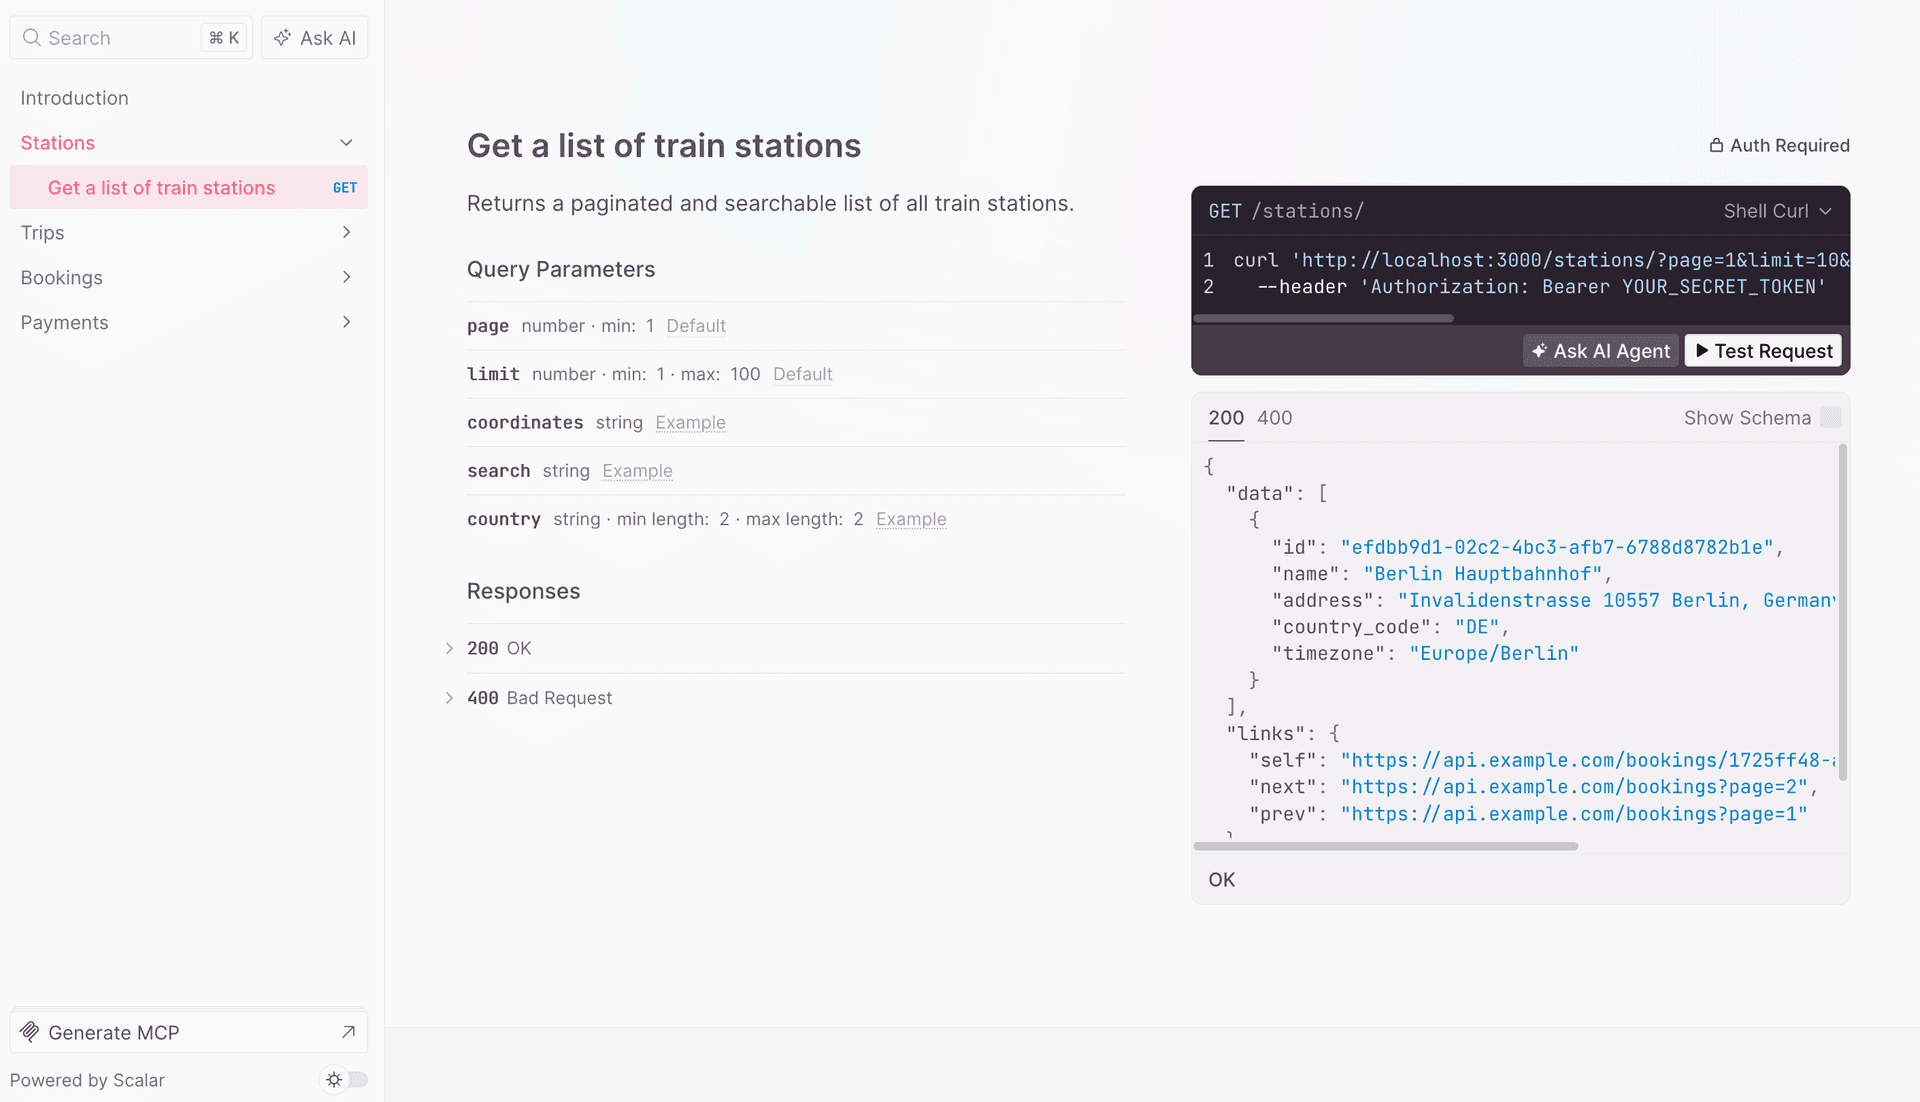
Each section shows information about an API endpoint, such as its path parameters, body, and responses.
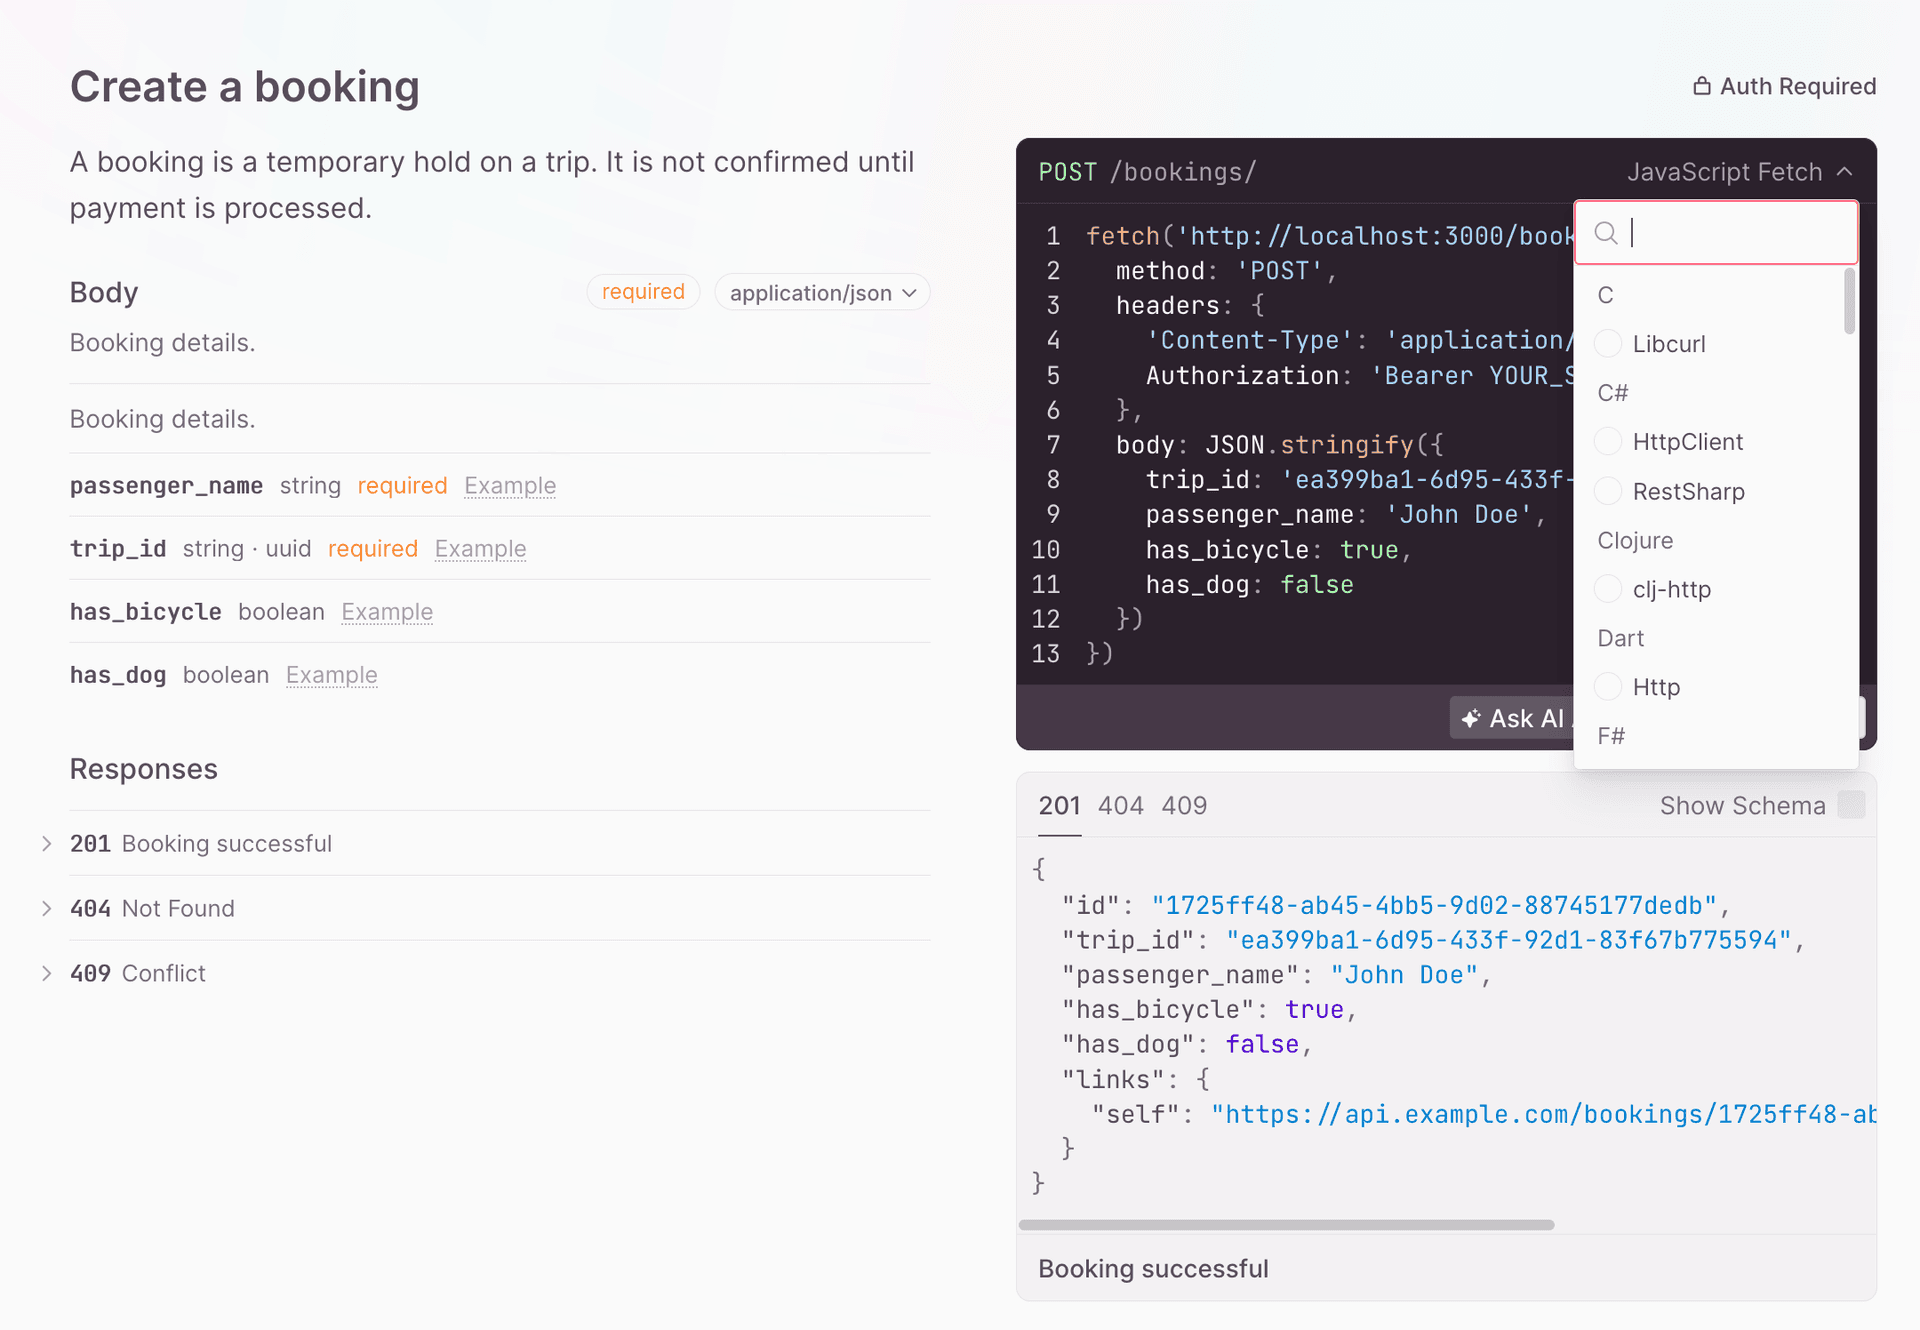
The code block on the right shows an example curl request. Click the Shell cURL dropdown menu to change the language or library used in the example request:
Click the Test Request button to open an API client that lets you test your API endpoints. Then, click Send to test the request:
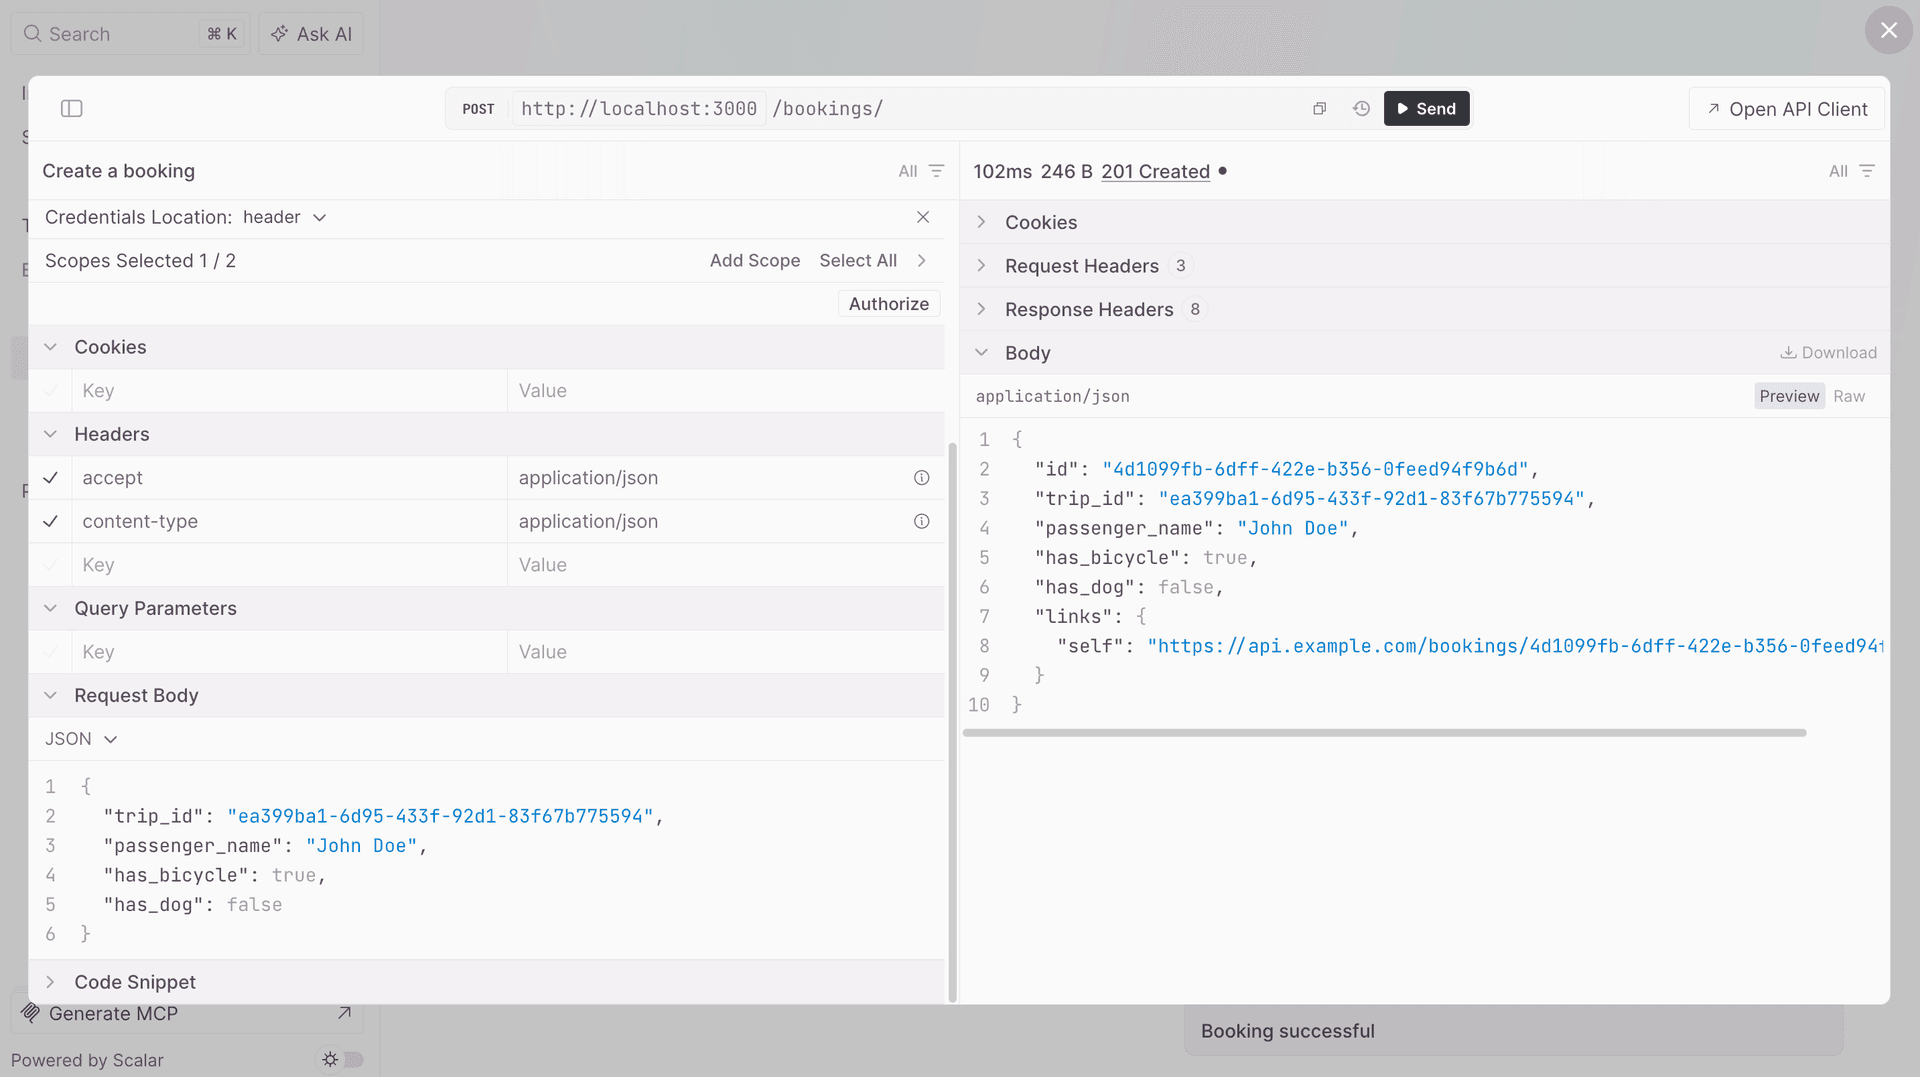
In the response, the API returns Train Travel resource data, such as bookings and stations.
The Train Travel sample defines reusable schemas for resource objects:
export const stationSchema = t.Object(
  {
    id: t.String({ format: "uuid", example: "efdbb9d1-02c2-4bc3-afb7-6788d8782b1e" }),
    name: t.String({ example: "Berlin Hauptbahnhof" }),
    address: t.String({ example: "Invalidenstrasse 10557 Berlin, Germany" }),
    country_code: t.String({ example: "DE" }),
    timezone: t.String({ example: "Europe/Berlin" }),
  },
  {
    description: "A train station.",
  },
);
These route groups are added to the Elysia instance:
import { stationsController } from "./controllers/stations";
import { tripsController } from "./controllers/trips";
import { bookingsController } from "./controllers/bookings";

const app = new Elysia()
  .use(stationsController)
  .use(tripsController)
  .use(bookingsController);
This keeps resources isolated by domain (stations, trips, bookings) and makes route metadata easier to maintain.
Viewing the OpenAPI document and modifying its root object
Open http://localhost:3000/openapi/json to view the OpenAPI document in JSON format:
openapi: 3.0.3
info:
    "title": "Train Travel API",
    "description": "API for finding and booking train trips across Europe.",
    "version": "1.0.50"
  },
  "paths": {
    "/bookings": {
      "get": {
        "operationId": "getBookings",
        "responses": {
          "200": {

          }
        }
      },
      "post": {
     // ...
Add the following TypeScript configuration option to your tsconfig.json file to enable JSON file imports:
"resolveJsonModule": true,Add the following configuration object to the openapi plugin:
import { openapi } from "@elysia/openapi";
import { Elysia } from "elysia";
// !mark
import packageJson from "../package.json";
import { stationsController } from "./controllers/stations";
import { tripsController } from "./controllers/trips";
import { bookingsController } from "./controllers/bookings";

const app = new Elysia()
  .onError(({ error, code }) => {
    if (code === "NOT_FOUND") {
      return {
        type: "https://example.com/errors/not-found",
        title: "Not Found",
        status: 404,
        detail: "The requested resource was not found.",
      };
    }
    console.error(error);
  })
  .use(stationsController)
  .use(tripsController)
  .use(bookingsController)
  .use(
    // !mark(2:12)
    openapi({
      documentation: {
        info: {
          title: "Train Travel API",
          description: "API for finding and booking train trips across Europe.",
          version: packageJson.version,
        },
        servers: [
          {
            url: "https://api.example.com",
            description: "Production",
          },
          {
            url: "http://localhost:3000",
            description: "Development server",
          },
        ],
        tags: [
          { name: "Stations", description: "Find and filter train stations across Europe." },
          { name: "Trips", description: "Timetables and routes for train trips between stations." },
          { name: "Bookings", description: "Create and manage bookings for train trips." },
          { name: "Payments", description: "Pay for bookings and view payment status." },
        ],
        security: [
          {
            OAuth2: ["read"],
          },
        ],
        components: {
          securitySchemes: {
            OAuth2: {
              type: "oauth2",
              flows: {
                authorizationCode: {
                  authorizationUrl: "https://example.com/oauth/authorize",
                  tokenUrl: "https://example.com/oauth/token",
                  scopes: {
                    read: "Read access",
                    write: "Write access",
                  },
                },
              },
            },
          },
        },
      },
    }),
  )
  .listen(3000);
This configures the root document object of the OpenAPI document.
The info object is a required property used to add metadata about the API. The externalDocs object lets you extend your documentation by referencing an external resource.
Note that the API operation for each path has an operationId value that’s named by combining the HTTP request type and the name of the path. The value can be modified using the detail field in a route; however, we won’t modify it in this guide, as Elysia produces consistently named, human-readable operationId values.
The operationId is the identifier for an operation. It is case sensitive and must be unique within the document. The Speakeasy SDK, which we’ll use later in this guide, uses it during code generation to name the method it generates for the operation.
OpenAPI Specification versions supported by Elysia and Speakeasy
Speakeasy currently supports the OpenAPI Specification versions 3.0 to 3.2. The recommendation is to use at least version 3.1, as it’s fully compatible with JSON Schema , which gives you access to a large ecosystem of tools and libraries .
The guide uses OpenAPI v3.0.3 as it is the latest version Elysia supports at time of writing, although we have sent them a pull request to get them to v3.1. 🤞
To check which version you are using, open http://localhost:3000/openapi/json and see the OpenAPI Specification version in the root document object.
Adding example data to a data model and the POST request body
The API routes in the Scalar UI should include example values for parameters, requests, and responses. Clear examples make API usage easier for SDK consumers.
Let’s start by adding example values to the booking creation model:
export const createBookingRequestSchema = t.Object(
  {
    trip_id: t.String({
      format: "uuid",
      example: "ea399ba1-6d95-433f-92d1-83f67b775594",
    }),
    passenger_name: t.String({ example: "John Doe" }),
    has_bicycle: t.Optional(t.Boolean({ example: true })),
    has_dog: t.Optional(t.Boolean({ example: false })),
  },
  {
    description: "Booking details.",
    example: {
      trip_id: "ea399ba1-6d95-433f-92d1-83f67b775594",
      passenger_name: "John Doe",
      has_bicycle: true,
      has_dog: false,
    },
  }
);
The Elysia schema builder, t, gives compile-time and runtime type safety. It also registers the model as a reusable OpenAPI Components Object schema, which you can see at the bottom of your OpenAPI document:
components:
  schemas:
    CreateBookingRequest:
      description: A booking for a train trip.
      type: object
      required:
        - id
        - trip_id
        - passenger_name
        - has_bicycle
        - has_dog
      properties:
        id:
          format: uuid
          example: 1725ff48-ab45-4bb5-9d02-88745177dedb
          type: string
        trip_id:
          format: uuid
          example: ea399ba1-6d95-433f-92d1-83f67b775594
          type: string
        passenger_name:
          example: John Doe
          type: string
        has_bicycle:
          example: true
          type: boolean
        has_dog:
          example: false
          type: boolean
You’ll also see these example values reflected in the Scalar model view:
The booking request schema is used by the booking post() route. Elysia HTTP request methods accept three arguments: the path, the handler, and a hook object for extra metadata. Add the schema to the body in the hook object:
{
  type: "json",
  body: createBookingRequestSchema,
  detail: {
    operationId: "create-booking",
  },
}
If you look at your OpenAPI document now, you’ll see that the content of the POST request body has three possible types: application/json, multipart/form-data, or text/plain. To limit it to application/json, set the type in the hook object of the post() route:
  .post(
    "/",
    ({ body, set, error }) => {
      // ... implementation ...
    },
    {
      type: "json",
      body: createBookingRequestSchema,
Adding extra information to a route using the detail field
The detail field is used to define a route for the OpenAPI document. It extends the OpenAPI Operation Object , which describes an API operation within a path.
Add the following detail field to the hook object of the post() route:
type: "json",
detail: {
  operationId: "create-booking",
  summary: "Create a booking",
  description: "A booking is a temporary hold on a trip.",
},
Add the following responses property to the detail object:
responses: {
  201: {
    description: "Booking successful",
    content: {
      "application/json": {
        schema: {
          $ref: "#/components/schemas/Booking",
        },
        examples: {
          "Created booking": {
            value: {
              id: "1725ff48-ab45-4bb5-9d02-88745177dedb",
              trip_id: "ea399ba1-6d95-433f-92d1-83f67b775594",
              passenger_name: "John Doe",
              has_bicycle: true,
              has_dog: false,
            }
          }
        }
      }
    },
  },
},
The Responses Object lists possible outcomes for the POST request. The success response includes a schema that describes the returned booking payload. The schema can be referenced with $ref.
Add the booking schema in src/train/schemas.ts:
export const bookingSchema = t.Object(
  {
    id: t.String({ format: "uuid", example: "1725ff48-ab45-4bb5-9d02-88745177dedb" }),
    trip_id: t.String({ format: "uuid", example: "ea399ba1-6d95-433f-92d1-83f67b775594" }),
    passenger_name: t.String({ example: "John Doe" }),
    has_bicycle: t.Boolean({ example: true }),
    has_dog: t.Boolean({ example: false }),
  },
  {
    description: "A booking for a train trip.",
  },
);
Create the bookings route group where this schema is used:
export const bookingsController = new Elysia({ prefix: "/bookings" })This route group owns booking-related endpoints and their OpenAPI metadata.
It’s also good practice to add possible error responses. Add the following 500 response to the responses property:
500: {
  description: "Internal Server Error",
  content: {
    "application/problem+json": {
      schema: {
        $ref: "#/components/schemas/Problem",
      },
    }
  }
}
Add a reusable problem schema for error responses:
export const problemSchema = t.Object(
  {
    type: t.String({ example: "https://example.com/errors/not-found" }),
    title: t.String({ example: "Not Found" }),
    status: t.Number({ example: 404 }),
    detail: t.String({ example: "The requested resource was not found." }),
  },
);
Reference this problem schema in route responses:
detail: {
responses: {
404: {
description: "Not Found",
content: {
"application/problem+json": {
schema: problemSchema,
},
},
},
},
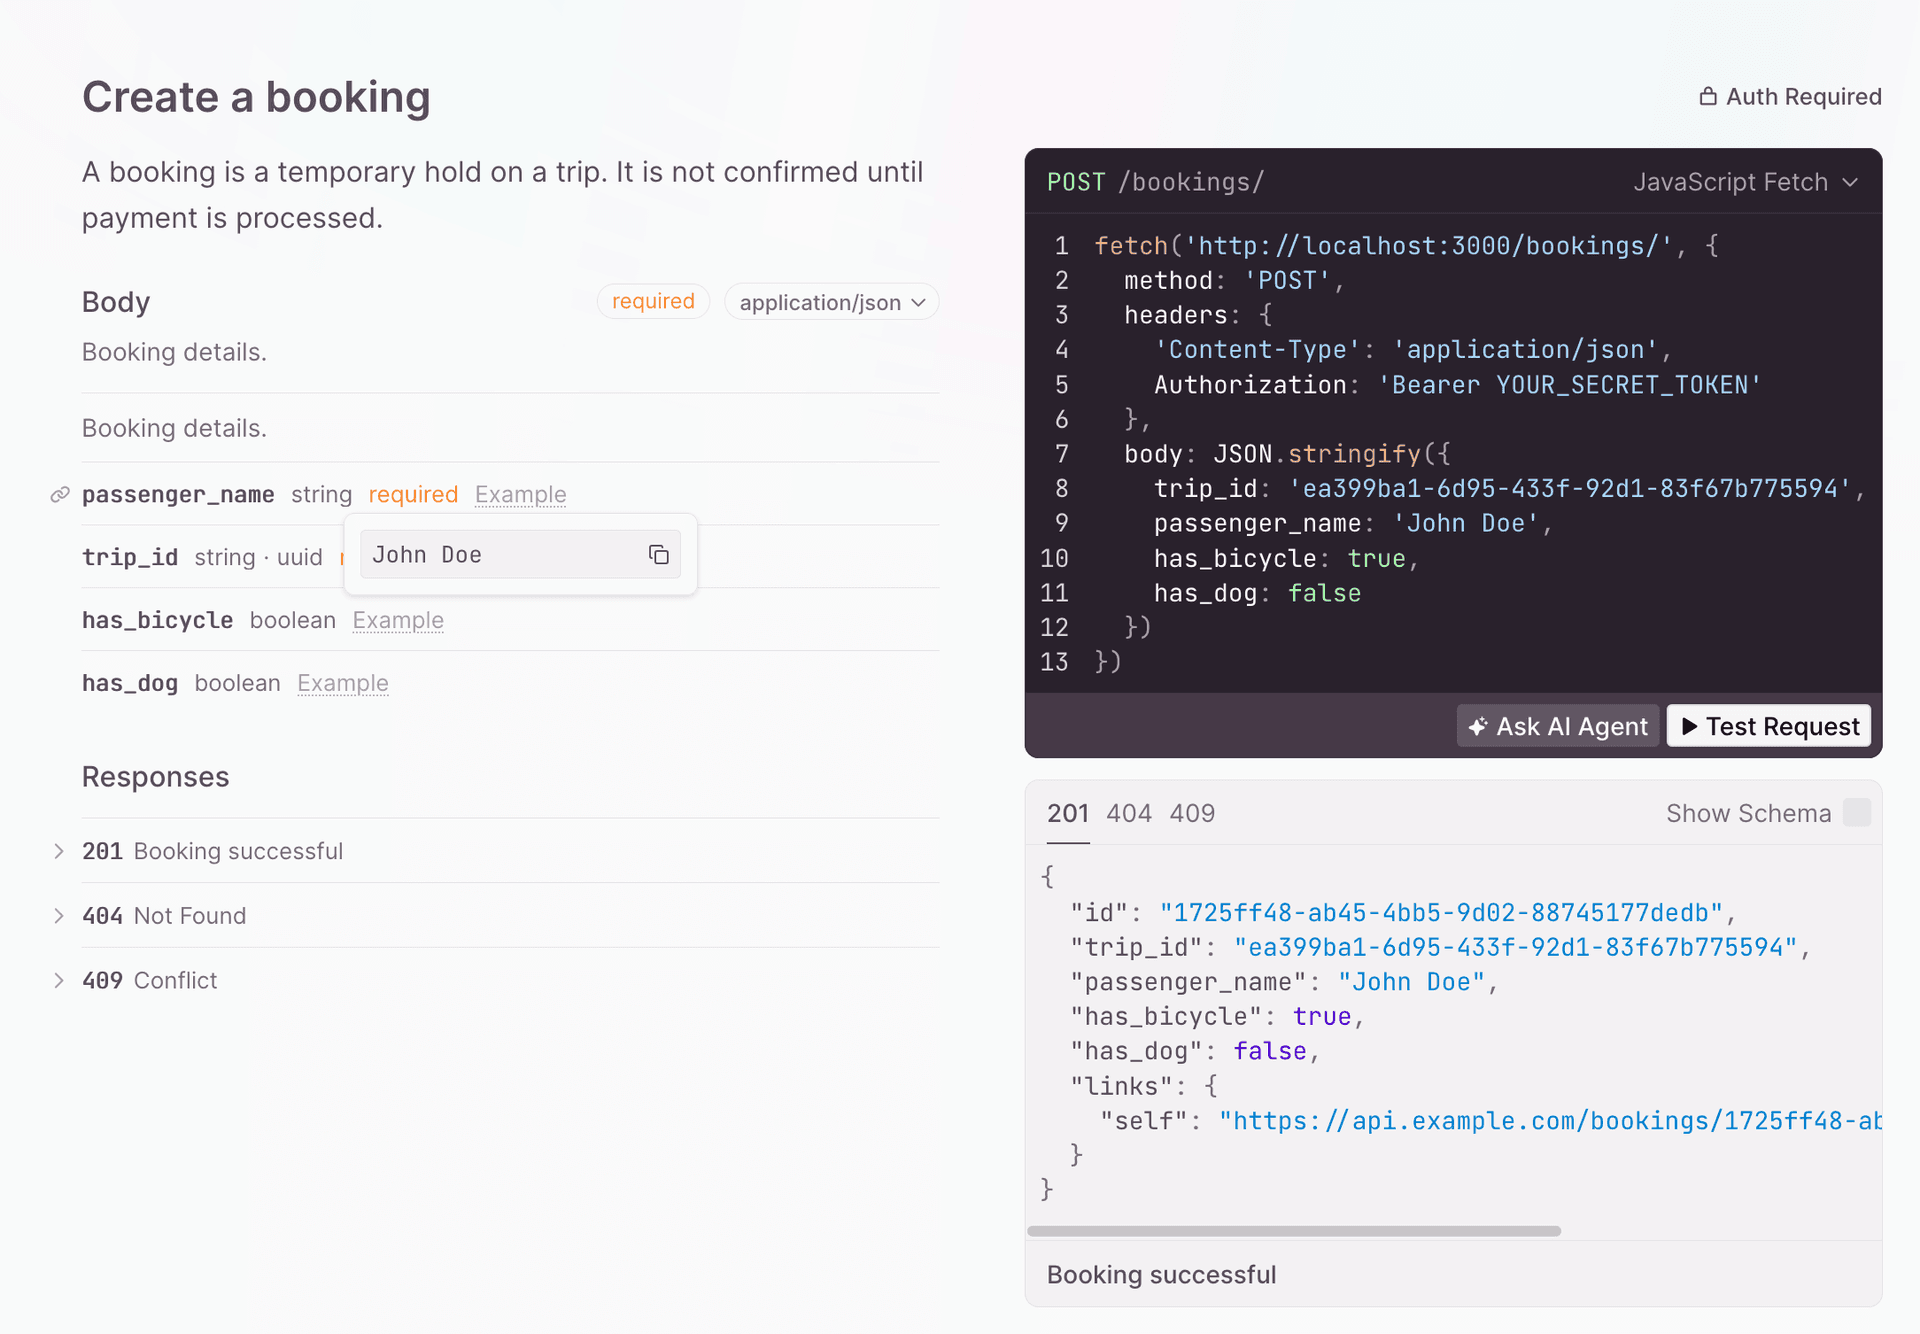
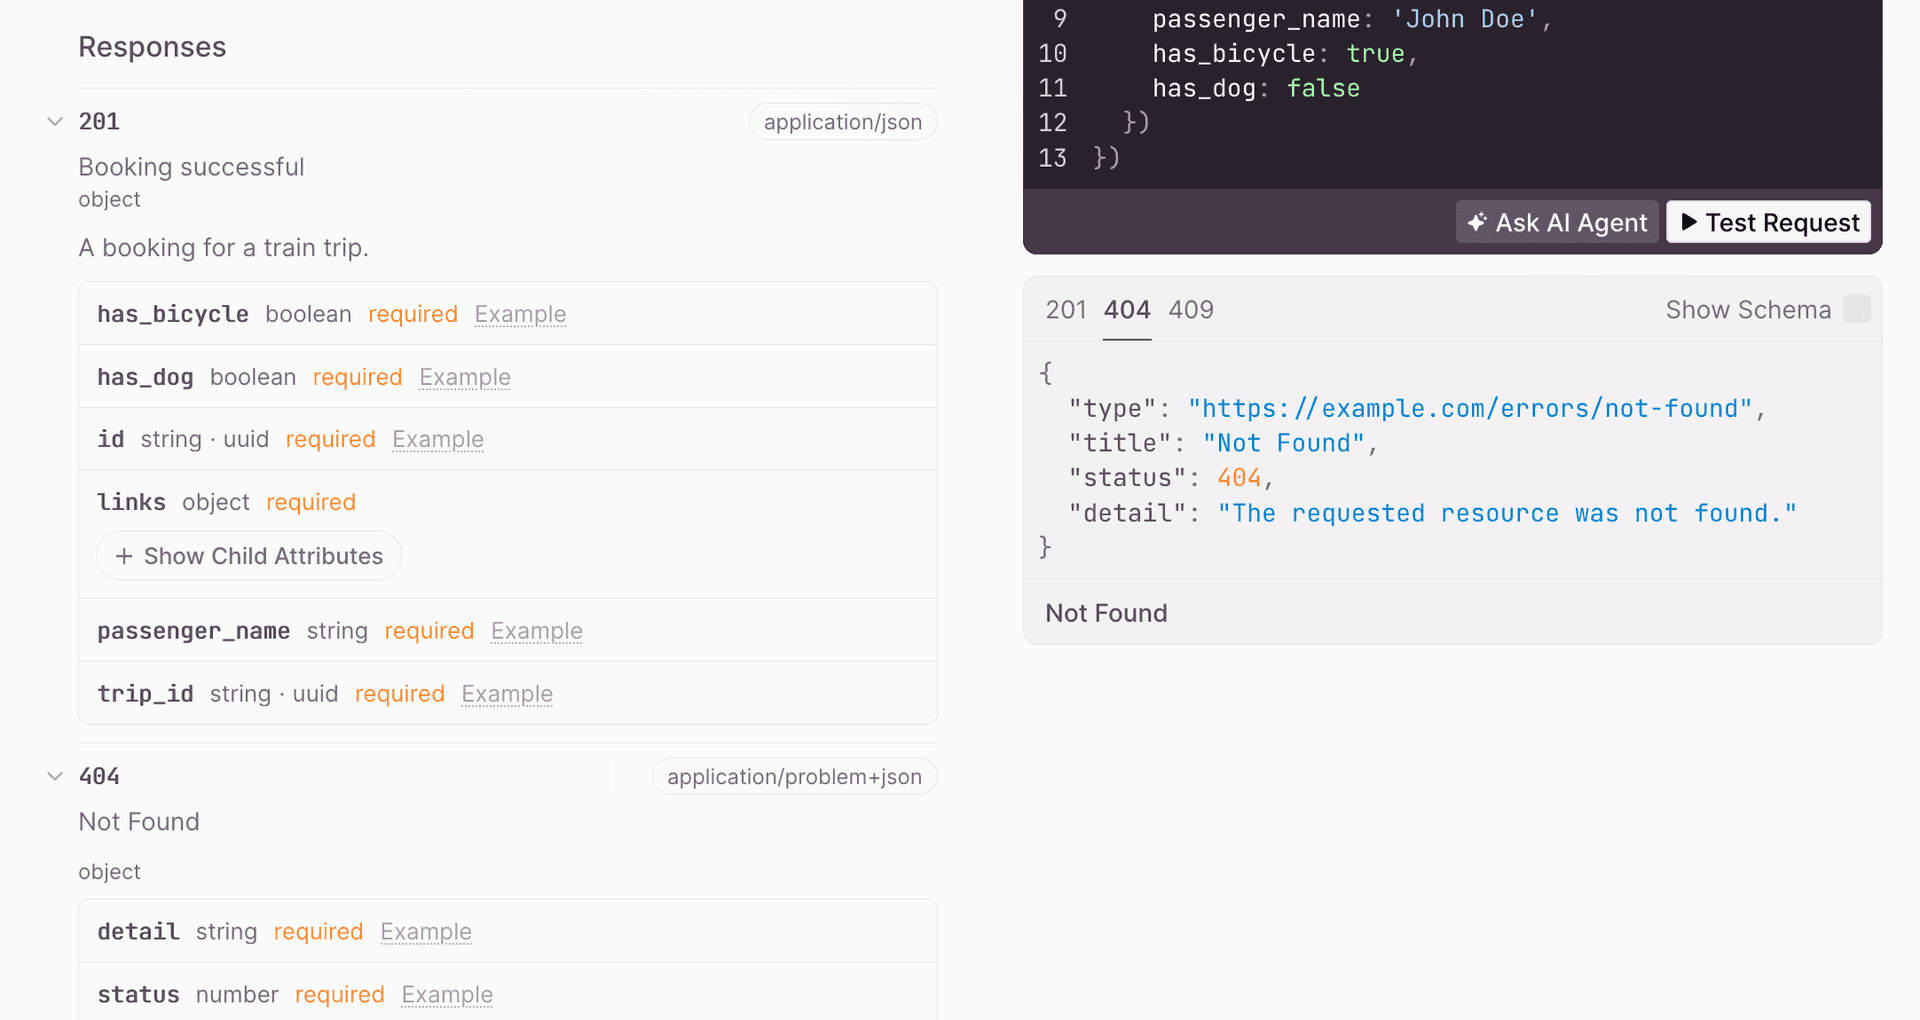
}You’ll now see example responses for the Create booking POST route in Scalar:
Adding OpenAPI tags to routes
We recommend adding tags to all your Elysia routes. This allows you to group the routes according to tag in the generated SDK code and documentation.
Adding OpenAPI tags to routes in Elysia
To add OpenAPI tags to a route, use the tags property to pass in an array of tags in the hook object of the post() route:
tags: ["Bookings"];Adding tags to the root OpenAPI document object and adding metadata to tags
Add the following tags array to the configuration object of the openapi plugin:
  .use(
    openapi(
      {
      documentation: {
        info: {
          title: 'Train Travel API',
          version: packageJson.version,
        },
        tags: [
          {
            name: 'Stations',
            description: 'Find and filter train stations across Europe.',
          },
          {
            name: 'Trips',
            description: 'Timetables and routes for train trips between stations.',
          },
          {
            name: 'Bookings',
            description: 'Create and manage bookings for train trips.',
          },
          {
            name: 'Payments',
            description: 'Pay for bookings and view payment status.',
          },
        ],
      }
    })
  )
This adds a tags array to the root OpenAPI document object. In the above code, we add metadata to the tag by passing in a Tag Object (instead of a string) to the tag array item.
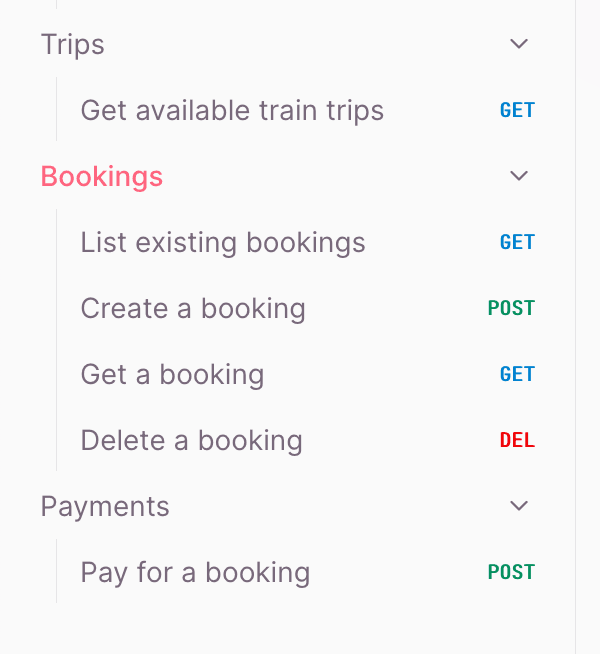
After adding tags to your routes, you’ll see that they are organized by tags in Scalar:
Adding example data, extra information, and tags to the other API routes
Let’s improve the other API route operations with the same pattern used for Create booking.
Replace the Get stations route with the following lines of code:
.get('/', ({ query }) => {
  const rows = listStations({ search: query.search, country: query.country });
  return {
    data: rows,
    links: {
      self: 'https://api.example.com/stations?page=1&limit=10',
    },
  };
},
  {
    detail: {
      operationId: 'get-stations',
      summary: 'Get a list of train stations',
      description: 'Returns a paginated and searchable list of all train stations.',
      responses: {
        200: {
          description: 'OK',
          content: {
            'application/json': {
              schema: {
                $ref: '#/components/schemas/Wrapper-Collection',
              }
            }
          },
        },
        500: {
          description: 'Server error',
          content: {
            'application/json': {
              schema: {
                $ref: '#/components/schemas/errorResponse'
              },
              examples: {
                "Server error": {
                  value: {
                    message: 'There was an error',
                    status: 500
                  }
                }
              }
            }
          }
        }
      },
      tags: ['Stations']
    },
  }
)
Replace the Get trips route with the following lines of code:
.get('/', ({ query, error }) => {
    if (!query.origin || !query.destination || !query.date) {
      return error(400, {
        type: 'https://example.com/errors/bad-request',
        title: 'Bad Request',
        status: 400,
        detail: 'origin, destination, and date are required.',
      })
    }

    return {
      data: listTrips({
        origin: query.origin,
        destination: query.destination,
        bicycles: query.bicycles,
        dogs: query.dogs,
      }),
      links: {
        self: `https://api.example.com/trips?origin=${query.origin}&destination=${query.destination}&date=${query.date}`,
      },
    }
  },
  {
    detail: {
      operationId: 'get-trips',
      summary: 'Get available train trips',
      description: 'Returns a list of available train trips between origin and destination stations.',
      responses: {
        200: {
          description: 'A list of available train trips',
          content: {
            'application/json': {
              schema: {
                $ref: '#/components/schemas/Wrapper-Collection',
              }
            }
          },
        },
        400: {
          description: 'Bad Request',
          content: {
            'application/problem+json': {
              schema: {
                $ref: '#/components/schemas/Problem'
              }
            }
          }
        }
      },
      tags: ['Trips']
    },
  },
)
Replace the Delete booking route with the following lines of code:
.delete('/:bookingId', ({ params, set, error }) => {
    const removed = deleteBooking(params.bookingId)

    if (!removed) {
      return error(404, {
        type: 'https://example.com/errors/not-found',
        title: 'Not Found',
        status: 404,
        detail: 'The requested resource was not found.',
      })
    }

    set.status = 204
    return ''
  },
  {
    detail: {
      operationId: 'delete-booking',
      summary: 'Delete a booking',
      description: 'Deletes a booking, cancelling the hold on the trip.',
      responses: {
        204: {
          description: 'Booking deleted',
        },
        404: {
          description: 'Not Found',
          content: {
            'application/problem+json': {
              schema: {
                $ref: '#/components/schemas/Problem'
              }
            }
          }
        }
      },
      tags: ['Bookings']
    },
  }
)
Add a schema for payment responses:
export const bookingPaymentSchema = t.Object(
  {
    id: t.String({ format: 'uuid', example: '2e3b4f5a-6b7c-8d9e-0f1a-2b3c4d5e6f7a' }),
    amount: t.Number({ example: 49.99 }),
    currency: t.String({ example: 'gbp' }),
    status: t.Union([t.Literal('pending'), t.Literal('succeeded'), t.Literal('failed')]),
  },
);
Add the payment route that returns this payment response shape:
.post('/:bookingId/payment', ({ params, body, error }) => {
  const booking = findBooking(params.bookingId)

  if (!booking) {
    return error(404, {
      type: 'https://example.com/errors/not-found',
      title: 'Not Found',
      status: 404,
      detail: 'The requested resource was not found.',
    })
  }

  const payment = createBookingPayment(params.bookingId, body)
  return {
    ...payment,
    links: { booking: `https://api.example.com/bookings/${booking.id}` },
  }
})
Replace this section with the Create booking payment route:
.post(
  '/:bookingId/payment',
  ({ params, body, error }) => {
    const booking = findBooking(params.bookingId)

    if (!booking) {
      return error(404, {
        type: 'https://example.com/errors/not-found',
        title: 'Not Found',
        status: 404,
        detail: 'The requested resource was not found.',
      })
    }

    return createBookingPayment(params.bookingId, body)
  },
  {
    type: 'json',
    body: bookingPaymentRequestSchema,
    detail: {
      operationId: 'create-booking-payment',
      summary: 'Pay for a booking',
      tags: ['Payments'],
    },
  },
)
Adding a list of servers to the Elysia OpenAPI document
When validating an OpenAPI document, Speakeasy expects a list of servers at the root of the document.
Add a server by adding a servers property to the configuration object of the openapi plugin:
.use(
  openapi(
    {
    documentation: {
      info: {
        title: 'Train Travel API',
        version: packageJson.version,
      },
      servers: [
        {
          url: 'https://api.example.com',
          description: 'Production',
        },
        {
          url: 'http://localhost:3000',
          description: 'Development server',
        },
      ],
You can add multiple servers to define different environments or versions. This is useful for separating production and testing environments.
Adding retries to your SDK with x-speakeasy-retries
OpenAPI document extensions allow us to add vendor-specific functionality to an OpenAPI document.
- Extension fields must be prefixed with
x-. - Speakeasy uses extensions that start with
x-speakeasy-.
Speakeasy gives you fine-tuned control over the Speakeasy SDK via its range of Speakeasy extensions , which you can use to modify retries, pagination, error handling, and other advanced SDK features.
Let’s add a Speakeasy extension that adds retries to requests from Speakeasy SDKs by adding a top-level x-speakeasy-retries schema to the OpenAPI document. We can also override the retry strategy per operation.
Adding global retries
Apply the Speakeasy retries extension globally by adding the following 'x-speakeasy-retries' property to the configuration object of the openapi plugin:
servers: [
  {
    url: 'https://api.example.com',
    description: 'Production',
  },
  {
    url: 'http://localhost:3000',
    description: 'Development server',
  },
],
'x-speakeasy-retries': {
  strategy: 'backoff',
  backoff: {
    initialInterval: 500,
    maxInterval: 60000,
    maxElapsedTime: 3600000,
    exponent: 1.5,
  },
  statusCodes: ['5XX'],
  retryConnectionErrors: true,
},
Adding retries per method
You can create a unique retry strategy for a single route by adding a 'x-speakeasy-retries' property to the route’s hook object:
      'x-speakeasy-retries': {
        strategy: 'backoff',
        backoff: {
          initialInterval: 300,
          maxInterval: 40000,
          maxElapsedTime: 3000000,
          exponent: 0.3,
        },
        statusCodes: ['5XX'],
        retryConnectionErrors: true,
      },
      tags: ['Bookings']
    },
  }
)
.get('/:bookingId', ({ params, error }) => {
Creating an SDK based on your OpenAPI document
Before creating an SDK, we need to save the Elysia OpenAPI plugin-generated document to a file. OpenAPI files are written as JSON or YAML; we’ll save it as a YAML file, as it’s easier to read.
Exporting OpenAPI as a YAML file using a Bun script
Elysia OpenAPI mainly only seems interested in serve the YAML or rendered API reference documentation over HTTP, but what if we need a openapi.yaml? Some folks will run the server then download that YAML via HTTP, but there’s a sneaky trick we can use to do it without needing to run the server.
The main application setup for Elysia in src/index.ts creates an app instance and listens to a port in one step, but we can split that app setup and listening into two steps. This allows us to create an app instance without starting a server, which we can use to request the OpenAPI document in JSON format directly from the app instance in a script.
This can be done with a new src/app.ts which contains everything the src/index.ts file contained, except for the .listen(3000) part, and exports a createApp function that returns the Elysia app instance:
import { Elysia } from "elysia";
import { stationsController } from "./controllers/stations";
import { tripsController } from "./controllers/trips";
import { bookingsController } from "./controllers/bookings";
import { openapi } from "@elysia/openapi";
import packageJson from "../package.json";

export const createApp = () =>
  new Elysia()
    .use(stationsController)
    .use(tripsController)
    .use(bookingsController)
    .use(
      openapi({
        openapiVersion: "3.1.2",
        documentation: {
          info: {
            title: "Train Travel API",
            description:
              "API for finding and booking train trips across Europe.",
            version: packageJson.version,
            // ...
      })
    );

export type App = ReturnType<typeof createApp>;
Now to get src/index.ts working, we just need to import the createApp function and call it to create an app instance, then call .listen(3000) on that instance:
import { createApp } from './app'

createApp().listen(3000)
With that done, time to reuse that application creation to generate an OpenAPI YAML file. First, install the js-yaml package to convert the OpenAPI JSON to YAML:
bun add js-yaml @types/js-yamlThen create a script called generateOpenAPIDocument.ts in the src folder and add the following lines of code to it:
import * as yaml from "js-yaml";
import { createApp } from "./app";

async function generateOpenAPI() {
  try {
    const app = createApp();
    const response = await app.handle(
      new Request("http://elysia/openapi/json")
    );

    if (!response.ok) {
      throw new Error(
        `Failed to generate OpenAPI JSON: ${response.status} ${response.statusText}`
      );
    }

    const openAPIObject = await response.json();

    // Convert to YAML
    const yamlString = yaml.dump(openAPIObject);

    // Save the YAML string to a file
    await Bun.write("openapi.yaml", yamlString);

    console.log("OpenAPI document saved to openapi.yaml");
  } catch (error) {
    console.error("Error generating OpenAPI document:", error);
  }
}

generateOpenAPI();
To run this functionality add this script in package.json:
  "scripts": {
    "generate:openapi": "bun run src/generateOpenAPIDocument.ts"
Run the generate:openapi script using the following command:
bun run generate:openapiThis generates an openapi.yaml file in your root folder, which we can then use for all sorts of things, such as generating an SDK with Speakeasy.
Linting the OpenAPI document with Speakeasy
The Speakeasy CLI has an OpenAPI linting command that checks the OpenAPI document for errors and style issues.
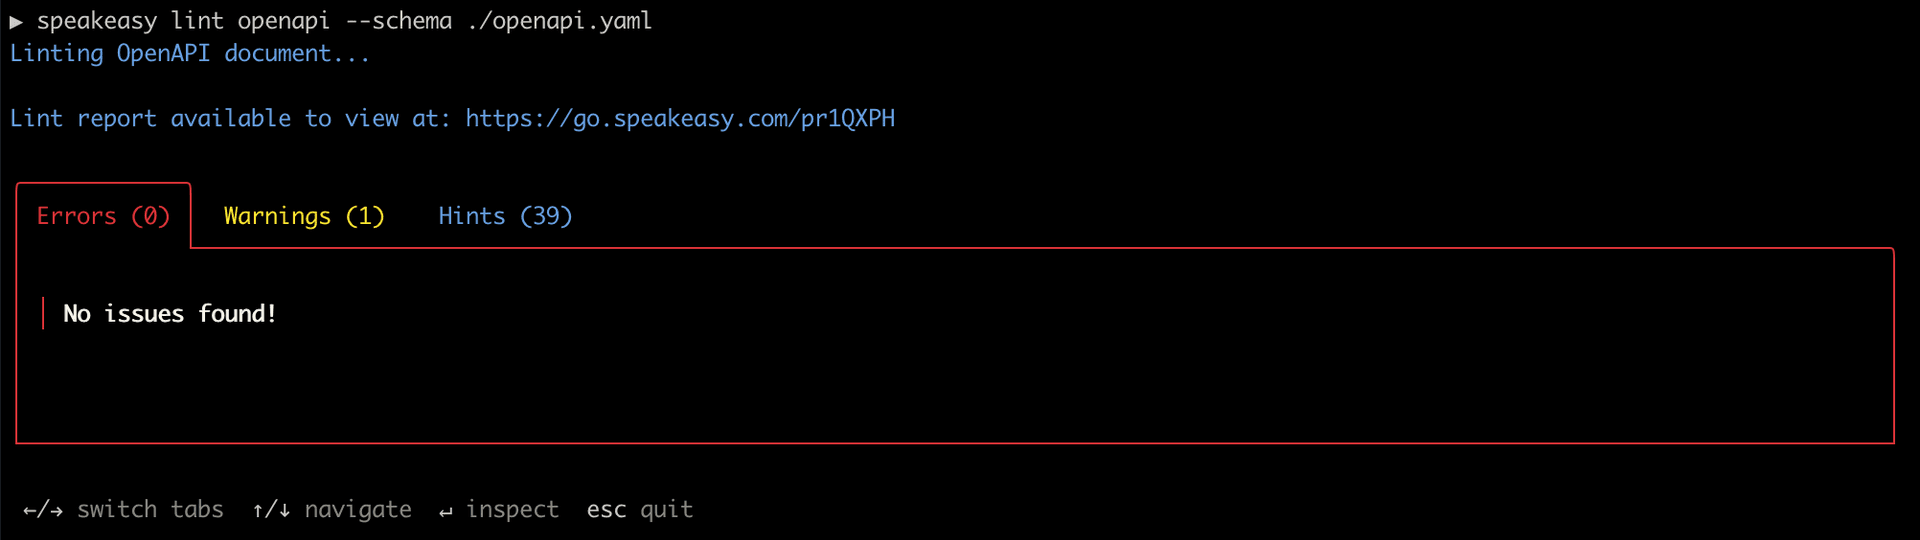
Run the linting command:
speakeasy lint openapi --schema ./openapi.yamlA lint report will be displayed in the terminal, showing errors, warnings, and hints:
The Speakeasy linter uses the speakeasy-recommended ruleset by default, but you can configure a custom ruleset.
Creating an SDK from the Speakeasy CLI
We’ll use the quickstart command for a guided SDK setup.
Run the command using the Speakeasy CLI:
speakeasy quickstartFollowing the prompts, provide the OpenAPI document location, name the SDK SDK, and select TypeScript as the SDK language.
In the terminal, you’ll see the steps taken by Speakeasy to generate the SDK.
│ Workflow - success
│ └─Target: sdk - success
│   └─Source: SDK -OAS - success
│     └─Validating Document - success
│     └─Diagnosing OpenAPI - success
│     └─Tracking OpenAPI Changes - success
│       └─Snapshotting OpenAPI Revision - success
│       └─Storing OpenAPI Revision - success
│   └─Validating gen.yaml - success
│   └─Generating Typescript SDK - success
│     └─Setup Environment - success
│     └─Load and Validate Document - success
│     └─Generate SDK - success
│     └─Compile SDK - success
Speakeasy validates the OpenAPI document to check that it’s ready for code generation. Validation issues will be printed in the terminal. The generated SDK is saved as a folder in your project.
If you get ESLint styling errors, run the speakeasy quickstart command from outside your project.
Adding SDK generation to your GitHub Actions
The Speakeasy sdk-generation-action repository provides workflows that integrate the Speakeasy CLI into CI/CD pipelines and automatically regenerate client SDKs when the reference OpenAPI document changes.
You can configure Speakeasy to push a new branch to your SDK repositories automatically when the OpenAPI document changes, allowing your engineers to review and merge the SDK changes.
The Speakeasy workflow matrix provides an overview of how to set up automatic SDK generation.
Using your SDK
Once you’ve generated your SDK, you can publish it for use. TypeScript SDKs are published as npm packages.
A quick, non-production-ready way to see your SDK in action is to copy your SDK folder to a frontend TypeScript project and use it there.
For example, you can create a Vite project that uses TypeScript:
npm create vite@latestThen, copy the SDK folder from your Elysia app to the src directory of your TypeScript Vite project and delete the SDK folder in your Elysia project.
In the SDK README.md file, you’ll find the documentation for your Speakeasy SDK.
Note that the SDK is not ready for production use. To get it production-ready, follow the steps outlined in your Speakeasy workspace.
The SDK includes Zod as a bundled dependency, as can be seen in the sdk-typescript/package.json file.
Replace the code in the src/main.ts file with the following example code adapted from the generated bookings SDK usage docs:
import { SDK } from "./sdk-typescript/src/"; // Adjust the path as necessary e.g. if your generated SDK has a different name

const sdk = new SDK();

async function run() {
  const result = await sdk.bookings.getBookings();

  // Handle the result
  console.log({ result });
}

run();
Make sure the Elysia server is running, then run the Vite dev server:
npm run devNow, you need to enable CORS in your Elysia dev server.
First, install the CORS plugin:
bun add @elysiajs/corsImport the CORS plugin, then register it by passing the plugin into the use() method and chaining the use() method to the Elysia instance:
import { cors } from "@elysiajs/cors";

const app = new Elysia()
  .use(
    cors({
      origin: "http://localhost:5173",
    }),
  );
Open http://localhost:5173 in your browser, then open your browser dev tools. You should see the following logged in the dev tools console:
{
  "result": {
    "data": [
      {
        "id": "1725ff48-ab45-4bb5-9d02-88745177dedb",
        "trip_id": "ea399ba1-6d95-433f-92d1-83f67b775594",
        "passenger_name": "John Doe",
        "has_bicycle": true,
        "has_dog": false
      }
    ],
    "links": {
      "self": "https://api.example.com/bookings?page=1&limit=10"
    }
  }
}
The SDK functions are type safe and include TypeScript autocompletion for arguments and outputs.
Consider the following example scenario:
const firstBooking = result.data[0].email;When you try to access a property that doesn’t exist, as in the code block above, you get a TypeScript error:
Property 'email' does not exist on type 'Booking'.Further reading
This guide covered the basics of generating an OpenAPI document using Elysia. Here are some resources to help you learn more about OpenAPI, the Elysia OpenAPI plugin, and Speakeasy:
- Elysia OpenAPI plugin : Learn more about using Elysia to generate OpenAPI documents. Elysia has first-class support for OpenAPI and follows the OpenAPI Specification by default.
- Speakeasy documentation : Speakeasy has extensive documentation covering how to generate SDKs from OpenAPI documents, customize SDKs, and more.
- Speakeasy OpenAPI reference : Review a detailed reference on the OpenAPI Specification.
Last updated on