How to generate an OpenAPI document with Hono
This guide demonstrates generating an OpenAPI document for a Hono API and using Speakeasy to create an SDK based on the generated document.
This guide covers:
- Adding Hono OpenAPI and Scalar UI to a Node.js Hono project.
- Generating an OpenAPI document using the Hono OpenAPI middleware with Zod validation.
- Improving the generated OpenAPI document to prepare it for code generation.
- Using the Speakeasy CLI to generate an SDK based on the OpenAPI document.
- Adding Speakeasy OpenAPI extensions to improve the generated SDK.
The generated SDK usage will also be demonstrated.
While the example application is simplified, the steps outlined should translate well to any Hono project.
The OpenAPI creation pipeline
Hono OpenAPI is middleware that enables automatic OpenAPI documentation generation for Hono APIs by integrating with validation libraries like Zod, Valibot, ArkType, and TypeBox. This guide uses Zod to define data schemas and validate values, then sets up the Hono app to generate an OpenAPI document.
The quality of the OpenAPI document determines the quality of generated SDKs and documentation, so techniques for improving the generated document will be explored based on the Speakeasy OpenAPI best practices.
The improved OpenAPI document will then be used to generate an SDK using Speakeasy.
Instructions for adding SDK creation to a CI/CD pipeline will be provided so that Speakeasy automatically generates fresh SDKs whenever the Hono API changes in the future.
Finally, a simplified example will demonstrate how to use the generated SDK.
Requirements
Ensure the following are installed:
- Node.js 18.14.1 or above (Node v22.15.1 was used for testing).
- The Speakeasy CLI, which will be used to generate an SDK from the OpenAPI document.
Sample code
The source code for the examples throughout this guide are available in the Speakeasy Hono example repository .
This guide starts from scratch with a new Hono project, but anyone adding OpenAPI documentation to an existing Hono project can jump straight to step 3.
Step 1: Scaffold a Hono project
Those starting from scratch, run the Hono project scaffold command to get a basic setup.
npm create hono@latest users-apiWhen prompted, select nodejs as the template. Then install dependencies:
cd users-api && npm installStep 2: Create a basic Web API
The scaffold generates a single src/index.ts. Split this into two files:
src/index.ts— starts the HTTP serversrc/app.ts— defines the Hono app and routes
Replace src/index.ts with:
import { serve } from '@hono/node-server'
import app from './app'

const port = 3000
console.log(`Server running on http://localhost:${port}`)

serve({ fetch: app.fetch, port })
Create src/app.ts:
import { Hono } from 'hono';

const app = new Hono();

app.get('/users', (c) => {
  return c.json([
    { id: '1', name: 'John Doe', age: 42 },
    { id: '2', name: 'Sarah Jones', age: 32 },
  ])
});

app.post('/users', async (c) => {
  const body = await c.req.json()
  return c.json({ id: '3', ...body }, 200)
});

app.get('/users/:id', (c) => {
  const id = c.req.param('id')
  return c.json({ id, name: 'John Doe', age: 42 })
});

export default app;
Run npm run dev and open http://localhost:3000/users to confirm the API is working.
Step 3: Add Hono OpenAPI middleware
The Hono OpenAPI middleware will be used to generate an OpenAPI document. This middleware works with validation libraries through Standard Schema , including Zod, Valibot, ArkType, and TypeBox.
This guide will use Zod (v4) schemas to validate values and types and to generate part of the OpenAPI document, but the same principles apply to the other supported validation libraries.
First, install the middleware and Zod:
npm i hono-openapi @hono/standard-validator zod@v4Next, create a schemas.ts file in the src folder, with Zod schemas for the data:
import { z } from "zod";

export const UserSelectSchema = z
  .object({
    id: z.string(),
    name: z.string(),
    age: z.number(),
  })
  .describe("User object")
  .meta({ ref: "UserSelect" });

export const UserInsertSchema = z
  .object({
    name: z.string(),
    age: z.number(),
  })
  .describe("User creation data")
  .meta({ ref: "UserInsert" });

export const patchUserSchema = UserInsertSchema.partial()
  .describe("User update data")
  .meta({ ref: "patchUser" });
The z object is imported directly from zod unlike other Hono/Zod integrations that modify it and extent it a bit. This is just a plain Zod instance, so check out the Zod documentation for more guidance.
One important thing here is .meta({ ref: "..." }), which registers schemas as reusable components exactly based on OpenAPI’s component structure and the JSON Schema $ref keyword.
Schemas can be created for anything that would benefit from a data schema, validation properties, and human-readable descriptions. This includes, but is not limited to, the JSON request body, query parameters, headers, and response data, and error messages.
export const idParamsSchema = z.object({
  id: z.string().min(3),
});

export const ErrorSchema = z
  .object({
    message: z.string(),
  })
  .describe("Error response")
  .meta({ ref: "Error" });
Step 4: Describe what endpoints should be doing with describeRoutes
With hono-openapi, the OpenAPI metadata and schemas are added through the describeRoute middleware.
For better code organization, and to avoid overloading src/app.ts with OpenAPI descriptions, consider splitting the route description objects from the route handlers.
Create a users.routes.ts file in the src/routes/users folder, with route description objects like this following:
import {
  ErrorSchema,
  UserSelectSchema,
} from "@/schemas";
import { resolver } from "hono-openapi";
import { z } from "zod";

export const listRoute = {
  description: "Get all users",
  responses: {
    200: {
      content: {
        "application/json": {
          schema: resolver(z.array(UserSelectSchema)),
        },
      },
      description: "The list of users",
    },
  },
};

export const createRoute = {
  description: "Create a user",
  responses: {
    200: {
      content: {
        "application/json": {
          schema: resolver(UserSelectSchema),
        },
      },
      description: "The created user",
    },
    422: {
      content: {
        "application/json": {
          schema: resolver(ErrorSchema),
        },
      },
      description: "The validation error(s)",
    },
  },
};

export const getOneRoute = {
  description: "Get a user by ID",
  responses: {
    200: {
      content: {
        "application/json": {
          schema: resolver(UserSelectSchema),
        },
      },
      description: "The requested user",
    },
    404: {
      content: {
        "application/json": {
          schema: resolver(ErrorSchema),
        },
      },
      description: "User not found",
    },
    422: {
      content: {
        "application/json": {
          schema: resolver(ErrorSchema),
        },
      },
      description: "Invalid id error",
    },
  },
};
These route description objects define the OpenAPI specification for each route. The resolver function converts Zod schemas to OpenAPI schemas, which will be used for request validation automatically when the validator middleware is used in the route handlers.
Step 5: Implement route handlers
With the endpoints described by OpenAPI in users.routes.ts it’s time to define the route handler logic itself. This is what the endpoint will actually do. Create something. Save something. Send something.
To implement this code we need another file, so create a users.handlers.ts file in the src/routes/users folder and use the following placeholder code.
import type { Context } from "hono";

export const list = async (c: Context) => {
  // TODO: db query to get all users
  return c.json(
    [
      {
        age: 42,
        id: "123",
        name: "John Doe",
      },
      {
        age: 32,
        id: "124",
        name: "Sarah Jones",
      },
    ],
    200,
  );
};

export const create = async (c: Context) => {
  const user = c.req.valid("json");
  console.log({ user });
  // TODO: db query to create a user
  return c.json(
    {
      id: "2342",
      age: user.age,
      name: user.name,
    },
    200,
  );
};

export const getOne = async (c: Context) => {
  const { id } = c.req.valid("param");
  // TODO: db query to get a user by id
  const foundUser = {
    age: 50,
    id,
    name: "Lisa Smith",
  };

  if (!foundUser) {
    return c.json(
      {
        message: "Not found",
      },
      404,
    );
  }
  return c.json(foundUser, 200);
};
With hono-openapi, handlers accept the one argument, which is Hono’s standard Context type. This gives access to the request data and other validation middleware logic, which can be accessed using c.req.valid().
The schemas are there, the app logic is written, but now it all needs to be brought together.
Step 6: Register application routes with the Hono router
For each endpoint in the API, it needs a route, a HTTP method, a path, and a handler. That’s regular Hono usage, but what’s extra for OpenAPI here is the two middlewares being added in: describeRoute and zValidator.
import { Hono } from "hono";
import { describeRoute, validator as zValidator } from "hono-openapi";

import { idParamsSchema, UserInsertSchema } from "@/schemas";
import * as handlers from "./users.handlers";
import * as routes from "./users.routes";

const router = new Hono();

router.get("/users", describeRoute(routes.listRoute), handlers.list);

router.post(
  "/users",
  describeRoute(routes.createRoute),
  zValidator("json", UserInsertSchema),
  handlers.create
);

router.get(
  "/users/:id",
  describeRoute(routes.getOneRoute),
  zValidator("param", idParamsSchema),
  handlers.getOne
);

export default router;
The important bits here are these two validators:
describeRoutemiddleware to add OpenAPI documentation to the route based on the route description objects defined inusers.routes.ts.validator(aliased aszValidator) middleware to validate requests and automatically add request schemas to OpenAPI.
By using the same Zod schema instance to both power the actual server-side validation logic, and generate the OpenAPI description (which is then used for documentation, mock servers, SDK generation, etc.) the implementation cannot get out of sync with the OpenAPI, something people have struggled with for years.
Step 7: Exporting OpenAPI and API reference documentation
Once all this is set up, it’s time to go about exporting the OpenAPI, and therefore creating API Reference Documentation, SDKs, or any other artifacts from this OpenAPI. One popular approach is to offer this up over HTTP so it can be used by anything with access to the API domain, therefore ensuring the correct version of the OpenAPI is being looked at.
One way to do this is with a src/lib/configureOpenAPI.ts file, that does three things:
- Add all the higher-level OpenAPI that’s not covered on the route-specific Zod-based stuff so far.
- Add a route for
/openapito export the OpenAPI itself. - Add a route for
/docswhich uses Scalar UI to turn that OpenAPI into beautiful simple API documentation.
Option 3 is optional, and will need the following NPM package to make it work:
npm install @scalar/hono-api-referenceThe code to do all of this will look like this.
import type { Hono } from "hono";
import { Scalar } from "@scalar/hono-api-reference";
import { openAPIRouteHandler } from "hono-openapi";
import packageJson from "../../package.json";

export const openAPIDocumentation = {
  info: {
    version: packageJson.version,
    title: "Users API",
  },
  externalDocs: {
    description: "Find out more about Users API",
    url: "www.example.com",
  },
};

export default function configureOpenAPI(app: Hono) {
  // Comment these out if exposing OpenAPI/Docs over HTTP is not wanted
  app.get(
    "/openapi",
    openAPIRouteHandler(app, {
      documentation: openAPIDocumentation,
    })
  );
  app.get(
    "/docs",
    Scalar({
      url: "/openapi",
      pageTitle: "Users Management API",
    })
  );
}
Now, pass in the Hono app instance to the configureOpenAPI function in the src/app.ts file:
import { Hono } from "hono";
import configureOpenAPI from "./lib/configureOpenAPI";
const app = new Hono();
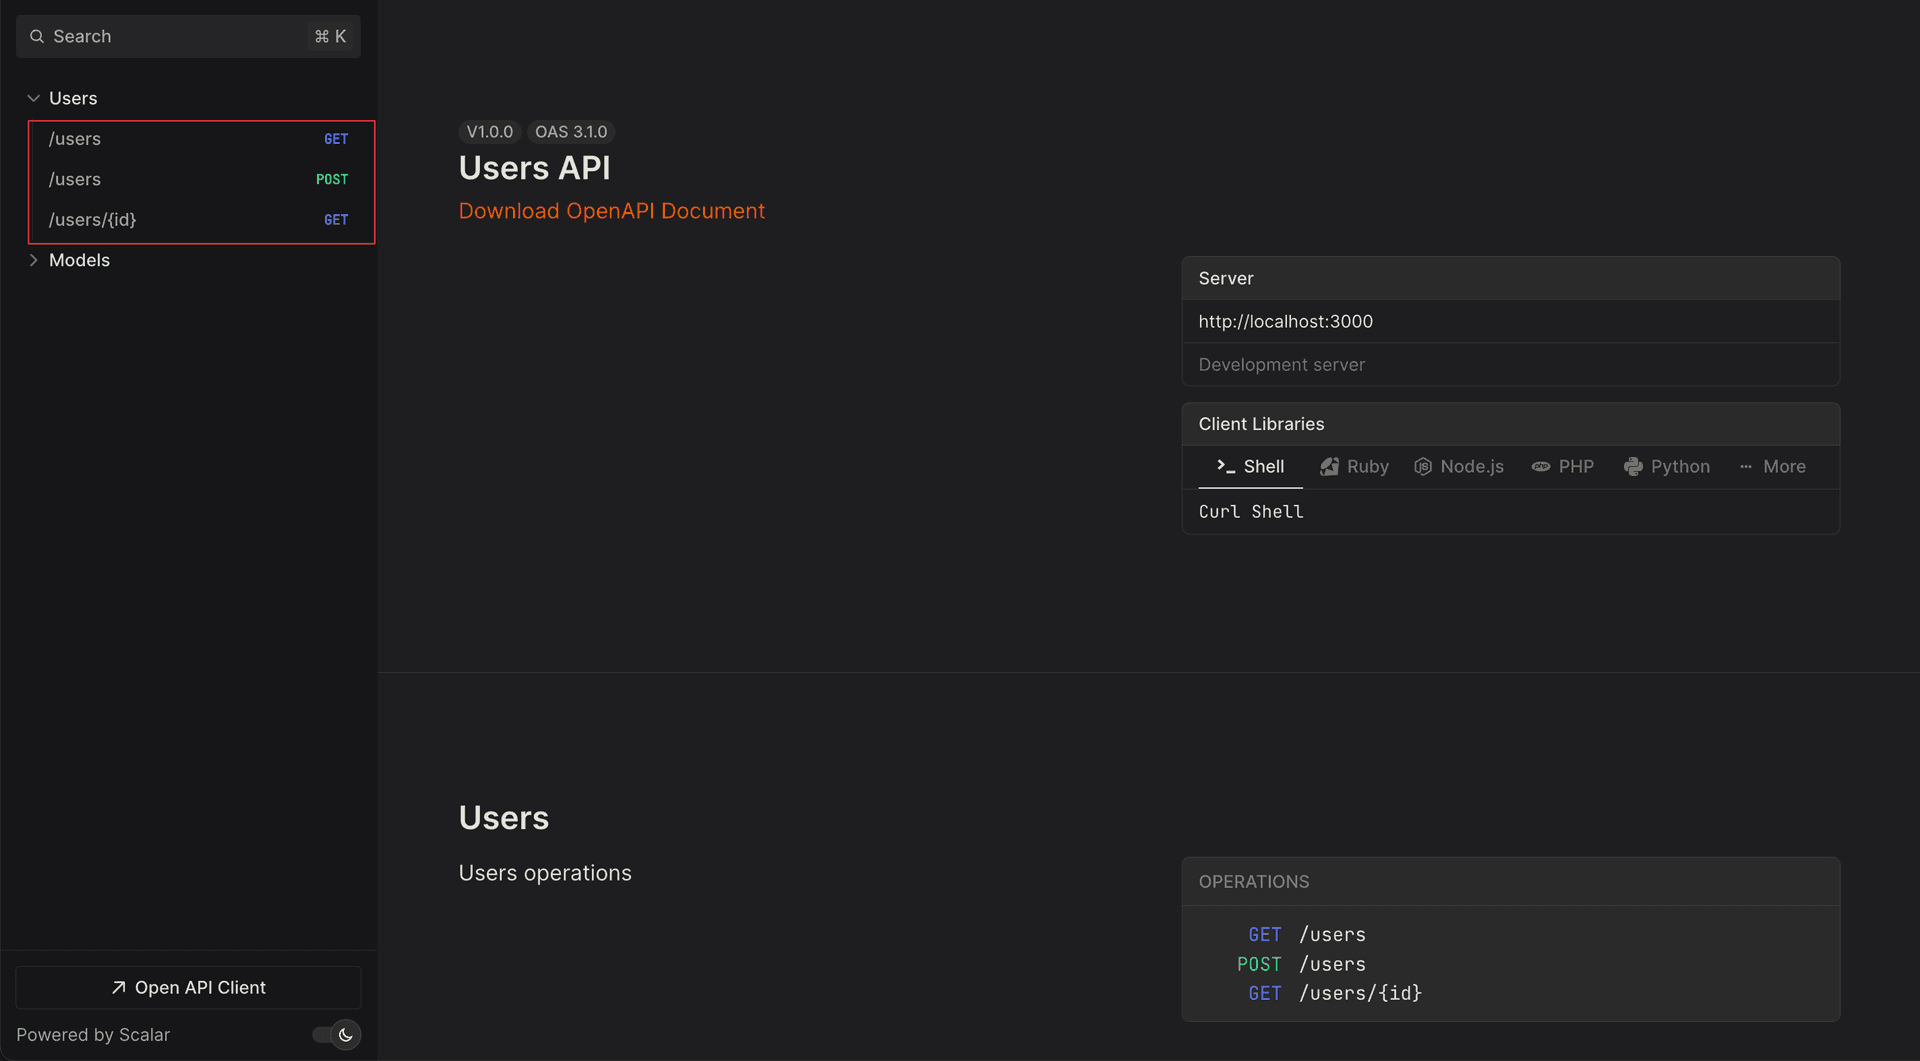
configureOpenAPI(app);To confirm this has all worked, go to http://localhost:3000/openapi to see the OpenAPI description in JSON, and navigate to http://localhost:3000/docs to see Scalar UI showing off the API documentation nicely.
Step 8: Save the OpenAPI description to a file
To generate an SDK, save the OpenAPI description as a YAML file. First, install the js-yaml package:
npm i js-yaml && npm i --save-dev @types/js-yamlCreate a script called generateOpenApiDocument.ts in the src/ folder. This script imports the whole Hono application, and the openAPIDocumentation from src/lib/configureOpenAPI.ts which brings in the generic OpenAPI not defined elsewhere in the application. Then it uses generateSpecs to extract the OpenAPI document, and writes it as YAML.
import fs from "node:fs";
import { generateSpecs } from "hono-openapi";
import yaml from "js-yaml";

import mainApp from "./app";
import { openAPIDocumentation } from "./lib/configureOpenAPI";

async function main() {
  const specs = await generateSpecs(mainApp, {
    documentation: openAPIDocumentation,
  });

  fs.writeFileSync("openapi.yaml", yaml.dump(specs));
}

main();
Add a script to package.json:
"generate:openapi": "npx tsx ./src/generateOpenApiDocument.ts"Run the script:
npm run generate:openapiAn openapi.yaml file will be created in the root folder.
Step 9: Lint the OpenAPI document
Even though this OpenAPI is being generated from Zod and Hono, it’s still possible to make some mistakes. To guide you through this process the Speakeasy CLI has an OpenAPI linting built in, which can check the OpenAPI document for errors and style issues.
Run the linting command:
speakeasy lint openapi --schema ./openapi.yamlA lint report will be displayed in the terminal, showing errors, warnings, and hints:
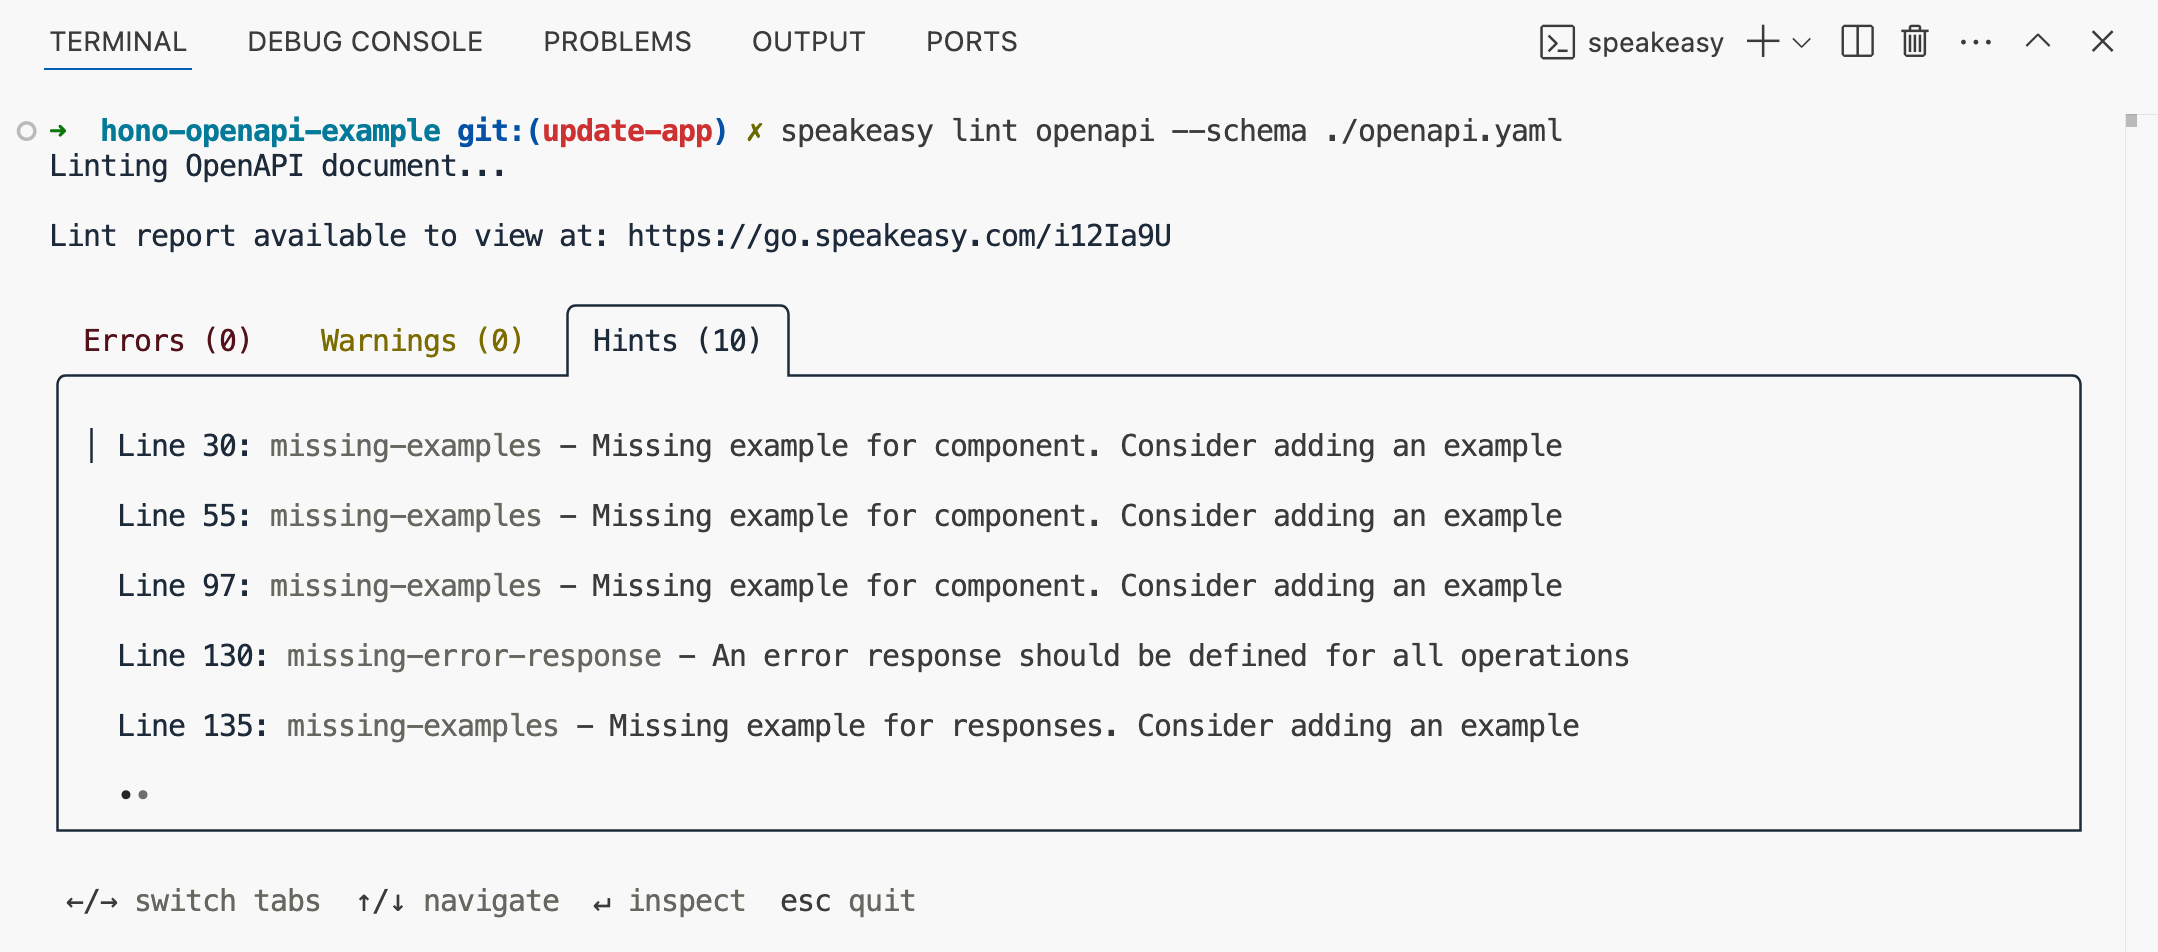
The Speakeasy Linter has a set of rules that can be configured.
Speakeasy has a VS Code extension to help validate OpenAPI documents for the creation of production-grade SDKs.
For advanced customization, Speakeasy transformations can modify the OpenAPI document (remove unused components, filter operations), and overlays can add extensions or examples without modifying the original document.
Step 10: Improving OpenAPI quality
Now that the OpenAPI is being generated as a local file and/or a URL and linted for validity, it is time to really polish this OpenAPI to make more tools have more information and therefore be more useful.
Add operationIds to routes
In the OpenAPI document, each HTTP request has an operationId that identifies the operation. The operationId is used to generate method names and documentation in SDKs, and often used for clean URLs in documentation, so it’s good to have them.
Add an operationId to each route documentation object:
export const listRoute = {
  operationId: 'getUsers',
  description: "Get all users",
  responses: {
    // ...
  },
};
Add tags to routes
Tags group operations in generated SDK code and documentation, improving navigation and URL structure. Add them to all routes using the tags property:
export const listRoute = {
  operationId: 'getUsers',
  description: "Get all users",
  tags: ['Users'],
  responses: {
    // ...
  },
};
Add tag metadata by including a Tag Object in the documentation configuration:
export const openAPIDocumentation = {
  info: {
    version: packageJson.version,
    title: "Users API",
  },
  externalDocs: {
    description: "Find out more about Users API",
    url: "www.example.com",
  },
  // !mark(1:8)
  tags: [{
    name: 'Users',
    description: 'Users operations',
    externalDocs: {
      description: 'Find more info here',
      url: 'https://example.com',
    },
  }],
};
Add servers to the OpenAPI document
Speakeasy expects a list of servers at the root of the OpenAPI document. Add a servers property to the documentation object:
export const openAPIDocumentation = {
  info: {
    version: packageJson.version,
    title: "Users API",
  },
  externalDocs: {
    description: "Find out more about Users API",
    url: "www.example.com",
  },
  // !mark(1:6)
  servers: [
    {
      url: 'http://localhost:3000/',
      description: 'Development server',
    },
  ],
  tags: [{
    name: 'Users',
    description: 'Users operations',
    externalDocs: {
      description: 'Find more info here',
      url: 'https://example.com',
    },
  }],
};
Step 11: Add retries with x-speakeasy-retries
Speakeasy extensions enable vendor-specific functionality in the OpenAPI document. Extension fields are prefixed with x-speakeasy-.
Add the x-speakeasy-retries extension to configure automatic retry behavior for SDK requests. Apply it globally in the documentation object:
export const openAPIDocumentation = {
  info: {
    version: packageJson.version,
    title: "Users API",
  },
  externalDocs: {
    description: "Find out more about Users API",
    url: "www.example.com",
  },
  servers: [
    {
      url: 'http://localhost:3000/',
      description: 'Development server',
    },
  ],
  // !mark(1:11)
  'x-speakeasy-retries': {
    strategy: 'backoff',
    backoff: {
      initialInterval: 500,
      maxInterval: 60000,
      maxElapsedTime: 3600000,
      exponent: 1.5,
    },
    statusCodes: ['5XX'],
    retryConnectionErrors: true,
  },
  tags: [{
    name: 'Users',
    description: 'Users operations',
    externalDocs: {
      description: 'Find more info here',
      url: 'https://example.com',
    },
  }],
};
Override the global retry strategy for a specific route by adding x-speakeasy-retries to that route’s documentation object:
export const listRoute = {
  operationId: 'getUsers',
  description: "Get all users",
  tags: ['Users'],
  // !mark(1:11)
  'x-speakeasy-retries': {
    strategy: 'backoff',
    backoff: {
      initialInterval: 300,
      maxInterval: 40000,
      maxElapsedTime: 3000000,
      exponent: 1.2,
    },
    statusCodes: ['5XX'],
    retryConnectionErrors: true,
  },
  responses: {
    // ...
  },
};
Step 12: Create the SDK
The quickstart command will be used for a guided SDK setup.
Run the command using the Speakeasy CLI:
speakeasy quickstartFollowing the prompts, provide the OpenAPI document location, name the SDK SDK, and select TypeScript as the SDK language.
In the terminal, the steps taken by Speakeasy to create the SDK will be displayed.
│ Workflow - success
│ └─Target: sdk - success
│   └─Source: Users API - success
│     └─Validating Document - success
│     └─Diagnosing OpenAPI - success
│     └─Tracking OpenAPI Changes - success
│       └─Snapshotting OpenAPI Revision - success
│       └─Storing OpenAPI Revision - success
│   └─Validating gen.yaml - success
│   └─Generating Typescript SDK - success
│     └─Setup Environment - success
│     └─Load and Validate Document - success
│     └─Generate SDK - success
│     └─Compile SDK - success
│     └─Setup Environment - success
│     └─Load and Validate Document - success
│     └─Generate SDK - success
│   └─Generating Code Samples - success
│     └─Snapshotting Code Samples - success
│       └─Snapshotting Code Samples - success
│       └─Uploading Code Samples - success
Speakeasy validates the OpenAPI document to check that it is ready for code generation. Validation issues will be printed in the terminal. The generated SDK will be saved as a folder in the project.
If ESLint styling errors occur, running the speakeasy quickstart command from outside the project will resolve them.
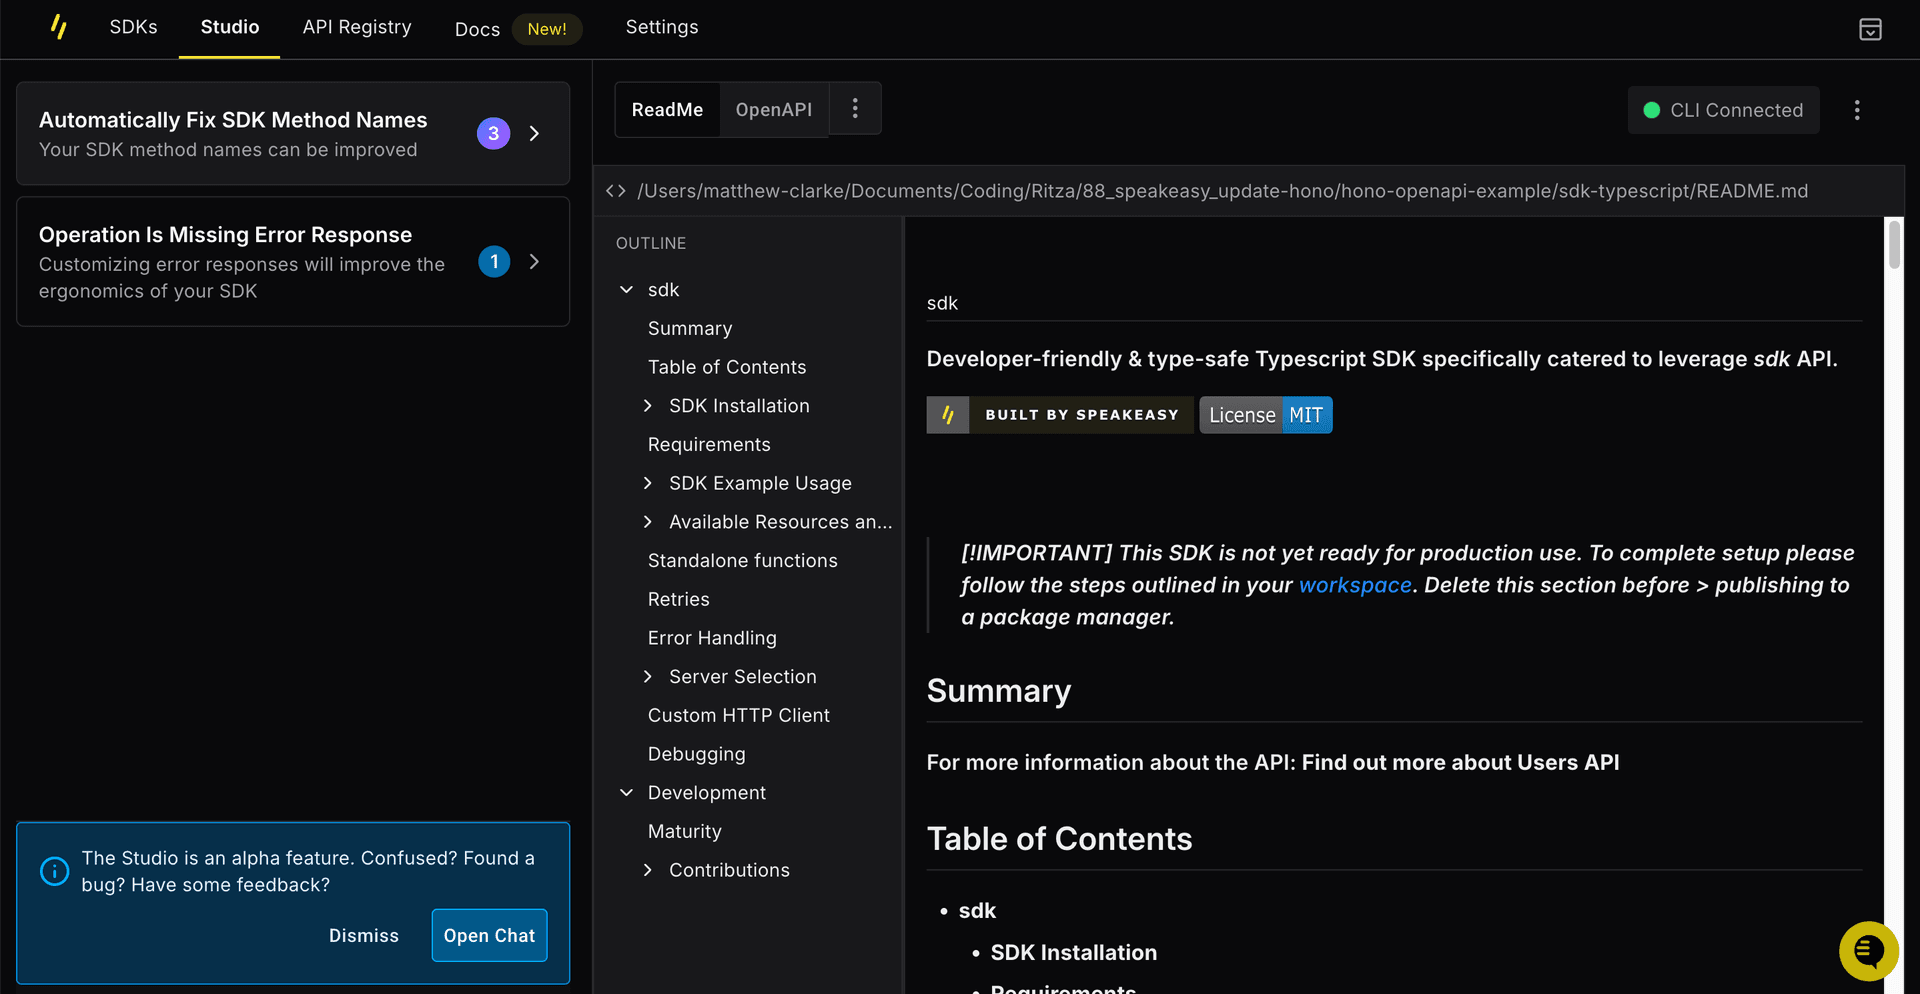
Speakeasy also suggests improvements for the SDK using Speakeasy Suggest, which is an AI-powered tool in Speakeasy Studio. Suggestions can be viewed by opening the link to the Speakeasy Studio workspace in the terminal:
Adding SDK generation to GitHub Actions
The Speakeasy sdk-generation-action repository provides workflows for integrating the Speakeasy CLI into CI/CD pipelines to automatically regenerate SDKs when the OpenAPI document changes.
Speakeasy can be set up to automatically push a new branch to SDK repositories so that engineers can review and merge the SDK changes.
For an overview of how to set up automation for SDKs, see the Speakeasy SDK Workflow Matrix.
Using the SDK
Once an SDK has been generated, it can be published for use. For TypeScript, it can be published as an npm package.
A quick, non-production-ready way to see the SDK in action is to copy the SDK folder to a frontend TypeScript project and use it there.
For example, a Vite project that uses TypeScript can be created:
npm create vite@latestCopy the SDK folder from the Hono app to the src directory of the TypeScript Vite project and delete the SDK folder in the Hono project.
In the SDK README.md file, documentation about the Speakeasy SDK can be found. TypeScript SDKs generated with Speakeasy include an installable Model Context Protocol (MCP) server where the various SDK methods are exposed as tools that AI applications can invoke.
The SDK documentation includes instructions for installing the MCP server.
Note that the SDK is not ready for production use. To get it production-ready, follow the steps outlined in the Speakeasy workspace.
The SDK includes Zod as a bundled dependency, as can be seen in the sdk-typescript/package.json file.
Replace the code in the src/main.ts file with the following example code taken from the sdk-typescript/docs/sdks/users/README.md file:
import { SDK } from "./sdk-typescript/src/"; // Adjust the path as necessary eg if your generated SDK has a different name

const sdk = new SDK();

async function run() {
  const result = await sdk.users.getUsers();

  // Handle the result
  console.log({ result });
}

run();
Run the Vite dev server:
npm run devEnable CORS in the Hono dev server by importing the built-in CORS middleware in the src/app.ts file:
import { cors } from "hono/cors";Add the middleware and set the origin to the Vite dev server URL:
app.use(
  "/users",
  cors({
    origin: "http://localhost:5173",
  }),
);
Run the Hono dev server as well:
npm run devThe following will be logged in the browser dev tools console:
{
  "result": [
    {
      "id": "123",
      "name": "John Doe",
      "age": 42
    },
    {
      "id": "124",
      "name": "Sarah Jones",
      "age": 32
    }
  ]
}
The SDK functions are type safe and include TypeScript autocompletion for arguments and outputs.
If attempting to access a property that doesn’t exist:
const userOne = result[0].surname;A TypeScript error will be displayed:
Property 'surname' does not exist on type 'UserSelect'Further reading
This guide covered the basics of generating an OpenAPI document using Hono. Here are some resources for learning more about OpenAPI, the Hono OpenAPI middleware, and Speakeasy:
-
The Hono OpenAPI documentation : Learn more about generating an OpenAPI document and validating values and types using multiple validation libraries through Standard Schema. The topics covered include installation, configuration, validation, and advanced usage.
-
The Hono OpenAPI examples with Zod : Official guide for using hono-openapi with Zod.
-
The Hono examples on OpenAPI : Official Hono documentation with examples of using the hono-openapi middleware.
-
The Speakeasy documentation: Speakeasy has extensive documentation covering how to generate SDKs from OpenAPI documents, how to customize SDKs, and more.
-
The Speakeasy OpenAPI reference: View a detailed reference for the OpenAPI Specification.
-
The Speakeasy Blog: Read articles about OpenAPI, SDK generation, and more, including:
Last updated on