How to generate an OpenAPI document with NestJS
Writing the code for an API is just one piece of the puzzle. Maximizing benefits in every phase of the API lifecycle requires creating an OpenAPI document that accurately describes the API, enabling documentation, testing, security scans, governance, SDK generation, and more. OpenAPI is a powerful tool for API teams, but it can be daunting to create and maintain an OpenAPI document on top of building the actual API.
Thankfully NestJS takes a lot of the effort out of creating an OpenAPI document, leveraging DTOs, validation decorators, and response models in the code to describe a large part of the API contract. With that legwork done, the main focus for creating high-quality OpenAPI document is expanding the metadata that generates with contextual information and descriptions that make the document useful for everyone who interacts with it.
This tutorial shows how to turn that existing structure into a useful OpenAPI document, and then use it with Speakeasy to generate SDKs.
Sample code
Follow along with this guide using the sample code in the Speakeasy examples repository , with this code living under
frameworks-nestjs. This sample code is based on the common OpenAPI example: the Train Travel API .
Here is what this guide covers:
- Install and configure
@nestjs/swagger. - Generate an OpenAPI v3.2 document from NestJS controllers and DTOs.
- Add Scalar API Reference for interactive documentation.
- Export the OpenAPI document to YAML format.
- Add stable
operationId, tags, and component schemas for SDK quality. - Add security schemes and Speakeasy extensions.
- Generate SDKs from the OpenAPI document.
Requirements
This guide assumes a NestJS application and basic familiarity with controllers, DTOs, and decorators, so the first step will be making sure the NestJS CLI is installed and the necessary dependencies are added to the project.
npm install -g @nestjs/cliInstall Speakeasy CLI for SDK generation:
brew install speakeasy-api/homebrew-tap/speakeasyThen add the necessary dependencies to your NestJS project via the preferred package manager:
npm install @nestjs/swagger @scalar/nestjs-api-reference class-transformer class-validator js-yamlTo quickly break these down a bit:
@nestjs/swagger- Generates OpenAPI documents from NestJS controllers and DTOs@scalar/nestjs-api-reference- Serves interactive API documentationclass-transformer&class-validator- Enable DTO validation and transformation with OpenAPI decoratorsjs-yaml- Writes the OpenAPI document to YAML format
The specific versions will change over time, but the versions used in this guide are:
{
  "dependencies": {
    "@nestjs/swagger": "^11.4.4",
    "@scalar/nestjs-api-reference": "^1.1.16",
    "class-transformer": "^0.5.1",
    "class-validator": "^0.15.1",
    "js-yaml": "^4.1.1"
  }
}
Teach NestJS to talk OpenAPI
NestJS uses the @nestjs/swagger package in src/main.ts, starting with the generic metadata that describes the API as a whole. This includes the title, description, version, and server URLs, and authentication schemes. This is the foundation of the OpenAPI document, and the parts that aren’t automatically generated from controllers and DTOs:
Describe routes with OpenAPI decorators
NestJS route decorators define runtime behavior. OpenAPI decorators add the details needed for generated docs and SDKs.
Start with one resource at a time. That keeps each controller small and makes it easier to verify that tags, parameters, and response schemas are being emitted the way the document needs them.
import { ValidationPipe } from '@nestjs/common';
import { NestFactory } from '@nestjs/core';
import { Station } from './entities/station.entity';
import { TrainService } from './train.service';
import {
  DocumentBuilder,
  SwaggerDocumentOptions,
  SwaggerModule,
} from '@nestjs/swagger';
import { AppModule } from './app.module';

async function bootstrap() {
  const app = await NestFactory.create(AppModule);

  app.useGlobalPipes(
    new ValidationPipe({
      whitelist: true,
      forbidNonWhitelisted: true,
      transform: true,
      errorHttpStatusCode: 400,
    }),
  );

  const config = new DocumentBuilder()
    .setOpenAPIVersion('3.2.0')
    .setTitle('Train Travel API')
    .setDescription('Find stations, discover trips, and create bookings across Europe.')
    .setVersion('1.2.1')
    .addServer('https://api.example.com', 'Production server')
    .addServer('http://localhost:3000', 'Local development server')
    .addBearerAuth(
      {
        type: 'http',
        scheme: 'bearer',
        bearerFormat: 'JWT',
        description: 'Bearer token authentication',
      },
      'BearerAuth',
    )
    .build();

  const options: SwaggerDocumentOptions = {
    operationIdFactory: (_controllerKey: string, methodKey: string) => methodKey,
  };

  const document = SwaggerModule.createDocument(app, config, options);

  // not actually... doing anything with it yet!

  await app.listen(3000);
}

bootstrap();
So far nothing is actually being done with all this, the variables are just going to waste. One of the first things people generally do is emit human-readable API documentation using open-source tools like Scalar.
Add Scalar API Reference
Scalar provides an interactive API documentation interface based on the OpenAPI document. Add it to src/main.ts to serve documentation at the /api endpoint:
import { apiReference } from '@scalar/nestjs-api-reference';

// ... existing imports and config ...

async function bootstrap() {
  // ... existing app setup ...

  const document = SwaggerModule.createDocument(app, config, options);

  writeFileSync('openapi.yaml', yaml.dump(document, { noRefs: true }));

  SwaggerModule.setup('api-json', app, document);
Resource-based controllers keep those operation names easy to map back to the NestJS code.
  app.use('/api', apiReference({ spec: { content: document } }));

  await app.listen(3000);
}

bootstrap();
Run the development server and open http://localhost:3000/api to see the Scalar UI:
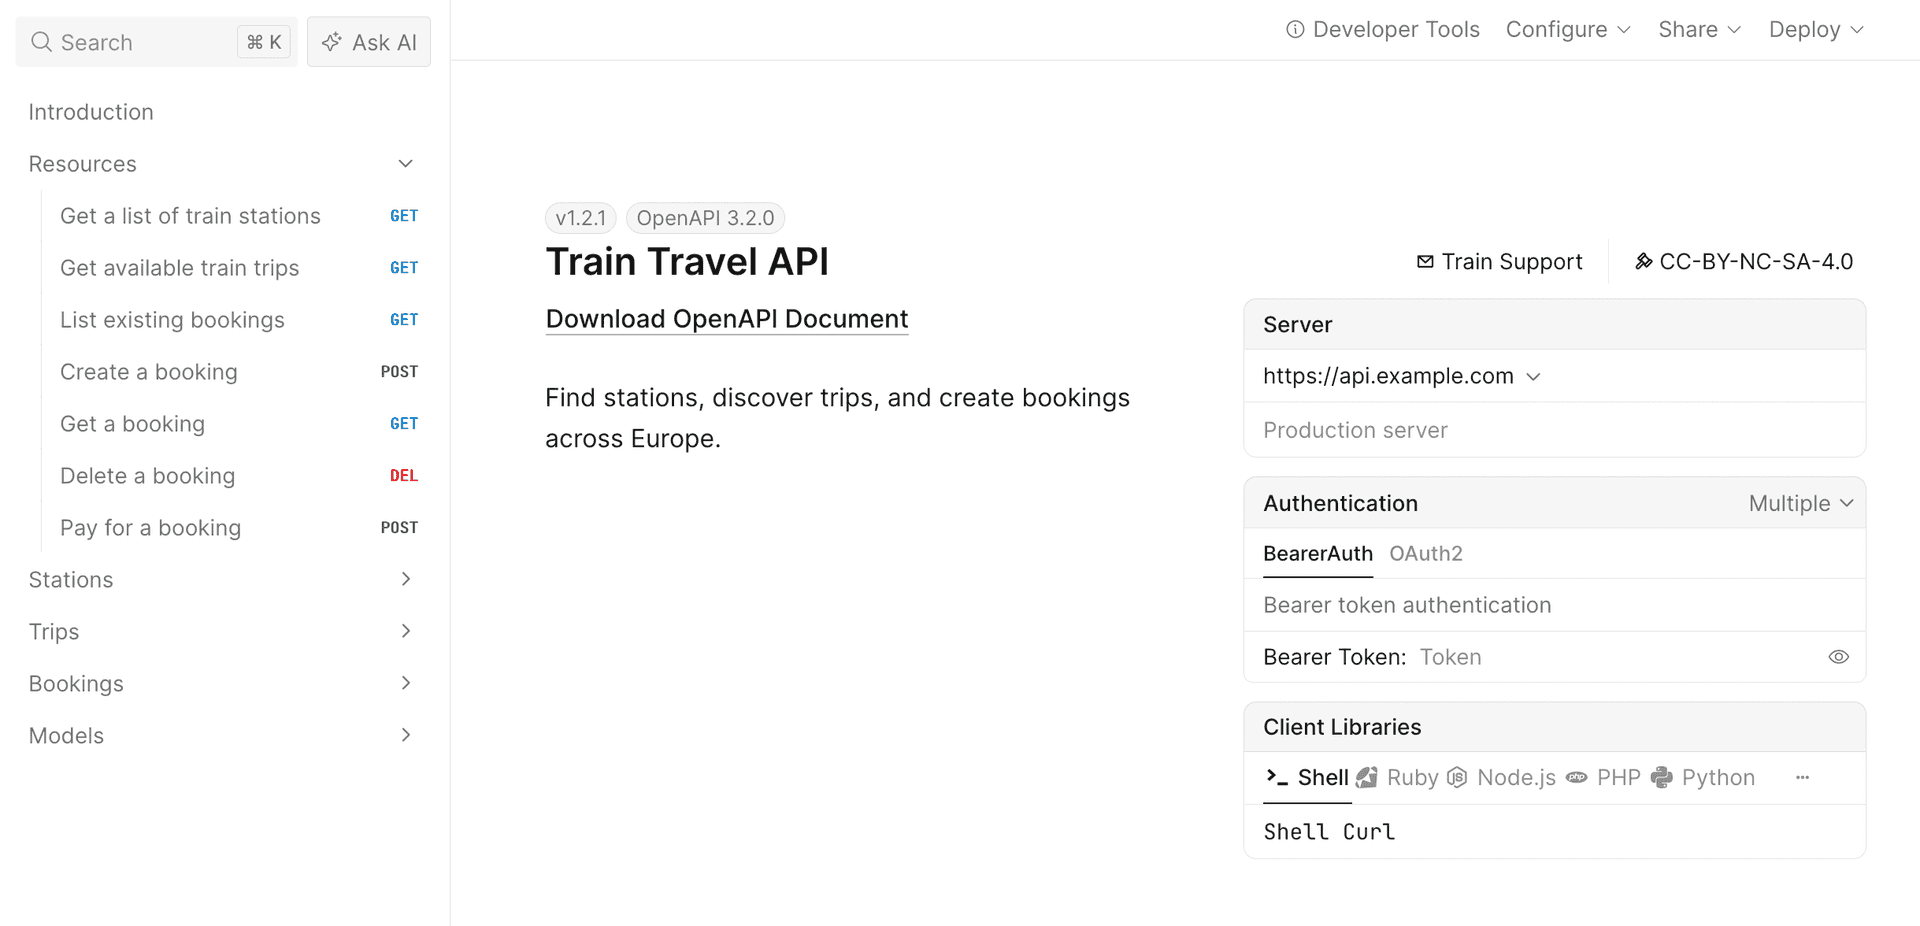
The API endpoints are listed in the navigation pane on the left. Click any endpoint to see its details, including path parameters, request body, and responses. The right panel shows example requests in different languages and libraries.
Click the Test Request button to open an API client that lets you test the endpoints directly from the documentation.
Export OpenAPI from NestJS
Having the documentation come right out of the application is handy, but many tools (like Speakeasy) will need an actual openapi.yaml to work with. To automate this, the build script can be configured to export the OpenAPI as a YAML file, by adding fs and js-yaml dependencies to src/main.ts:
import { writeFileSync } from 'fs';
import * as yaml from 'js-yaml';

// ... existing imports ...

async function bootstrap() {
  // ... existing app setup ...

  const document = SwaggerModule.createDocument(app, config, options);

  writeFileSync('openapi.yaml', yaml.dump(document, { noRefs: true }));

  await app.listen(3000);
}

bootstrap();
This writes the OpenAPI document to openapi.yaml in the project root each time the application starts. The noRefs option ensures that all YAML references are expanded inline, which some tools prefer.
Describe routes with OpenAPI decorators
NestJS uses route decorators to define all sorts of behavior, and OpenAPI is no different. Using decorators like @ApiOperation, @ApiQuery, and @ApiOkResponse allows details to be added to improve the quality of the OpenAPI.
import { Controller, Get, Query } from '@nestjs/common';
import { ApiOkResponse, ApiOperation, ApiQuery } from '@nestjs/swagger';
import { Station } from './entities/station.entity';
import { TrainService } from './train.service';

@Controller('stations')
export class StationsController {
  constructor(private readonly trainService: TrainService) {}

  @Get()
  @ApiOperation({ summary: 'Get a list of train stations' })
  @ApiQuery({ name: 'search', required: false, type: String })
  @ApiQuery({ name: 'country', required: false, type: String })
  @ApiOkResponse({ type: [Station] })
  getStations(
    @Query('search') search?: string,
    @Query('country') country?: string,
  ): Station[] {
    return this.trainService.getStations(search, country);
  }
}
The NestJS decorators define the controller name via @Controller which helps create the URL, and @Get makes it clear it’s a GET /stations. The OpenAPI decorators add the summary, query parameter details, and response schema that make the generated documentation useful for end-users.
Mixing core NestJS decorators with OpenAPI-specific decorators allows NestJS to cover the core basics and avoid repetition. There are some frameworks force developers to write the URL, HTTP methods and status codes again, despite it being right there a few lines away. Now that frameworks are a bit smarter they cut down the amount of OpenAPI specific stuff that needs to be written.
The reason for both @Query and @ApiQuery is that core NestJS does not know about OpenAPI, so it has nowhere for the extra properties to go like required and type.
Add DTO-backed query parameters for routes like GET /trips:
import { IsBoolean, IsDateString, IsOptional, IsUUID } from 'class-validator';

export class TripsQueryDto {
  /**
   * Origin station ID.
   * @example 'efdbb9d1-02c2-4bc3-afb7-6788d8782b1e'
   */
  @IsUUID()
  readonly origin!: string;

  /**
   * Destination station ID.
   * @example 'b2e783e1-c824-4d63-b37a-d8d698862f1d'
   */
  @IsUUID()
  readonly destination!: string;

  /**
   * Desired departure date in ISO 8601.
   * @example '2026-05-21T09:00:00Z'
   */
  @IsDateString()
  readonly date!: string;

  @IsOptional()
  @IsBoolean()
  readonly bicycles?: boolean;

  @IsOptional()
  @IsBoolean()
  readonly dogs?: boolean;
}
Then use it in the trips controller:
import { Controller, Get, Query } from '@nestjs/common';
import { ApiOkResponse, ApiOperation } from '@nestjs/swagger';
import { TripsQueryDto } from './dto/trips-query.dto';
import { Trip } from './entities/trip.entity';
import { TrainService } from './train.service';

@Controller('trips')
export class TripsController {
  constructor(private readonly trainService: TrainService) {}

  @Get()
  @ApiOperation({ summary: 'Get available train trips' })
  @ApiOkResponse({ type: [Trip] })
  getTrips(@Query() query: TripsQueryDto): Trip[] {
    return this.trainService.getTrips(query);
  }
}
Ensure schemas include property metadata
Without the Swagger plugin, generated component schemas can stay too thin for high-quality docs or SDKs. Enabling comment introspection fills in descriptions and examples from the model definitions already used by the app.
Enable the Nest Swagger plugin in nest-cli.json:
{
  "$schema": "https://json.schemastore.org/nest-cli",
  "collection": "@nestjs/schematics",
  "sourceRoot": "src",
  "compilerOptions": {
    "deleteOutDir": true,
    "plugins": [
      {
        "name": "@nestjs/swagger",
        "options": {
          "introspectComments": true
        }
      }
    ]
  }
}
With comment introspection enabled, doc comments on DTO and entity fields become descriptions and examples in components.schemas.
Example entity:
import { IsString, IsUUID } from 'class-validator';

export class Station {
  /**
   * Unique identifier for the station.
   * @example 'efdbb9d1-02c2-4bc3-afb7-6788d8782b1e'
   */
  @IsUUID()
  readonly id!: string;

  /**
   * Human-readable station name.
   * @example 'Berlin Hauptbahnhof'
   */
  @IsString()
  readonly name!: string;
}
These objects are then used in the OpenAPI document as response schemas, and the descriptions and examples are included in the generated documentation and SDKs.
Describing request bodies and non-200 responses
import {
Body,
Controller,
HttpCode,
Param,
Post,
} from '@nestjs/common';
import {
ApiBody,
ApiCreatedResponse,
ApiExtension,
ApiOkResponse,
ApiOperation,
ApiParam,
ApiTags,
} from '@nestjs/swagger';
import { CreateBookingDto } from './dto/create-booking.dto';
import { Booking } from './entities/booking.entity';
import { TrainService } from './train.service';
@Controller('bookings')
export class BookingsController {
constructor(private readonly trainService: TrainService) {}
@Post()
@HttpCode(201)
@ApiOperation({ summary: 'Create a booking' })
@ApiBody({ type: CreateBookingDto })
@ApiCreatedResponse({ type: Booking })
createBooking(@Body() payload: CreateBookingDto): Booking {
return this.trainService.createBooking(payload);
}
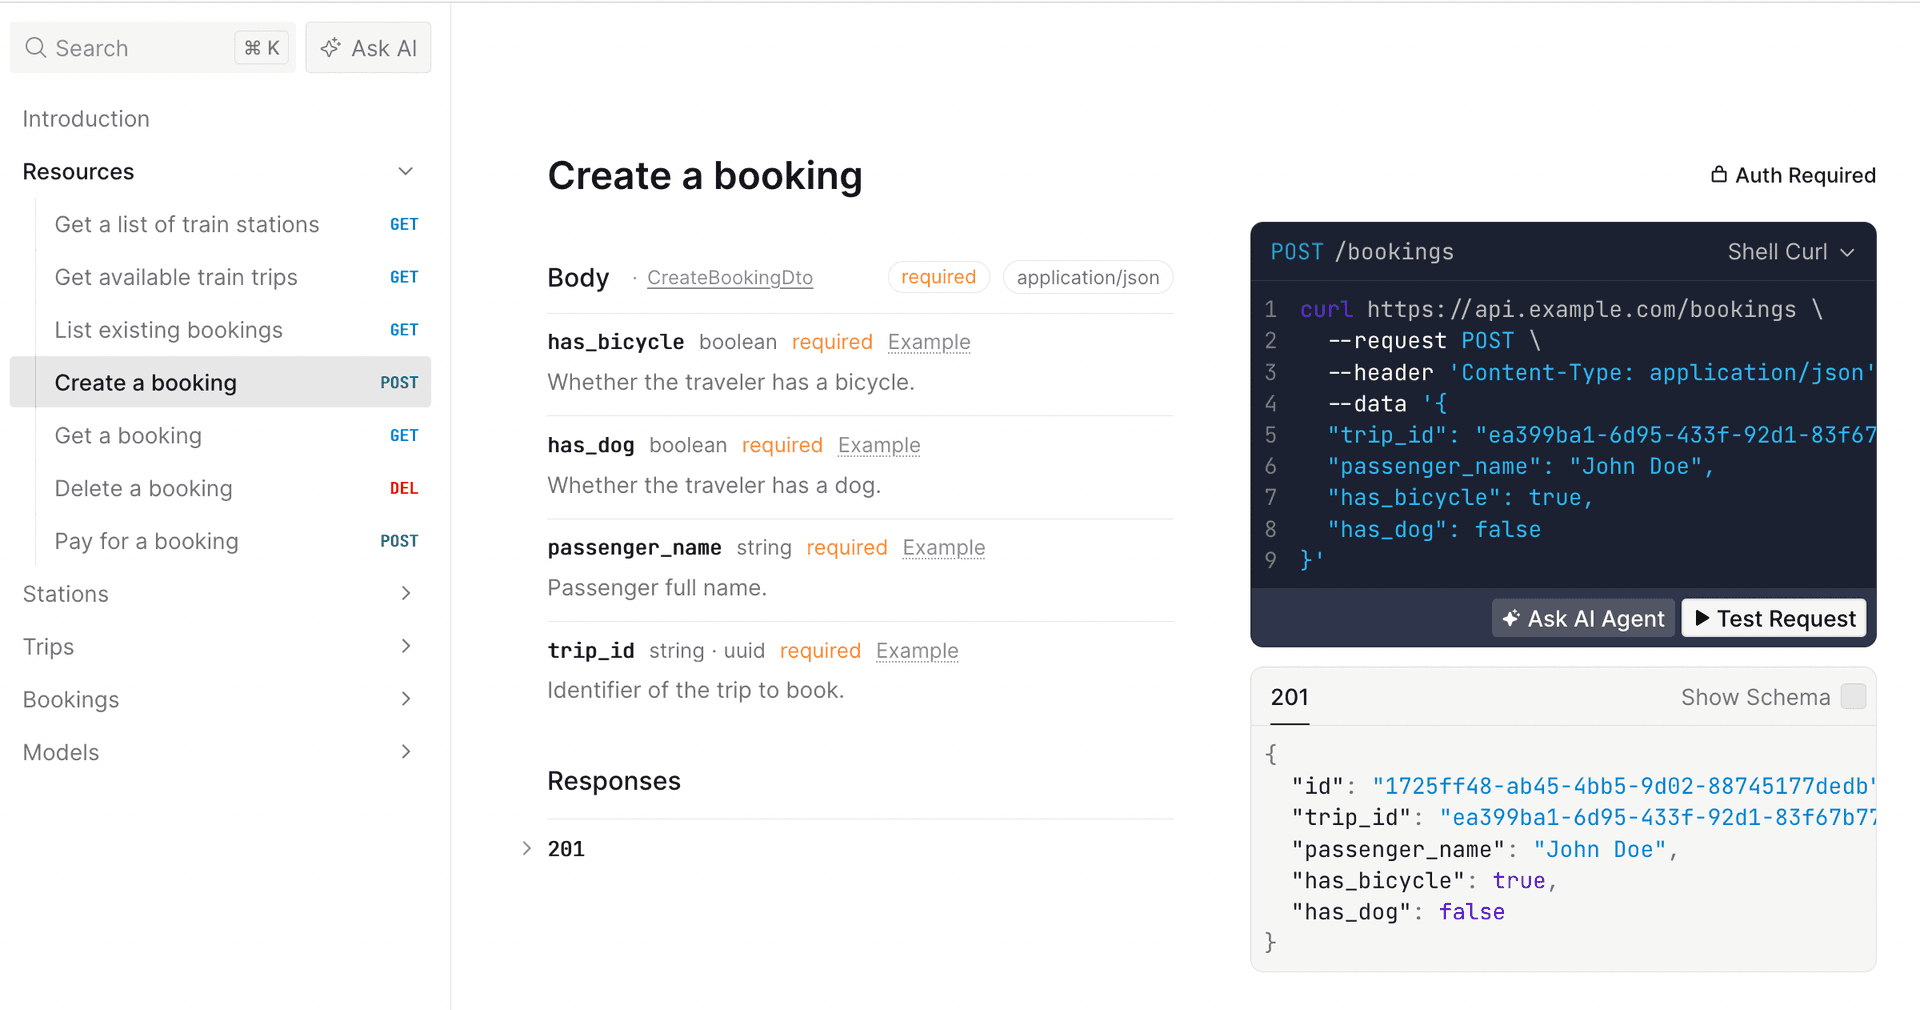
}The @ApiBody() decorator describes the request body schema, and @HttpCode(201) makes the success status explicit. NestJS uses 201 Created for POST handlers by default, but showing it in the controller keeps the intent obvious when scanning the code.
The request body for createBooking looks like this:
{
  "trip_id": "ea399ba1-6d95-433f-92d1-83f67b775594",
  "passenger_name": "John Doe",
  "has_bicycle": true,
  "has_dog": false
}
This produces a POST /bookings operation in the OpenAPI document with a requestBody section and a 201 response.
Add stable operationId values
SDK method names are derived from operationId, and SDK groupings are derived from tags.
Default operation names can become verbose, especially once controller names are included. Tightening them here keeps generated SDK method names shorter and easier to scan.
Use SwaggerDocumentOptions to keep operationId values short and stable:
const options: SwaggerDocumentOptions = {
  operationIdFactory: (_controllerKey: string, methodKey: string) => methodKey,
};

const document = SwaggerModule.createDocument(app, config, options);
This keeps operation names like getStations, getTrips, and createBooking instead of controller-prefixed names.
Tagging routes for better docs and SDKs
Use route tags to keep generated docs and SDK groups readable. Each controller now maps to one resource area, and the document builder defines the hierarchy up front:
const config = new DocumentBuilder()
  .setOpenAPIVersion('3.2.0')
  .addTag('Resources', 'Top-level navigation tag for related resources', undefined, {
    kind: 'nav',
  })
  .addTag('Stations', 'Find and filter train stations', undefined, {
    parent: 'Resources',
  })
  .addTag('Trips', 'Timetables and routes for train trips', undefined, {
    parent: 'Resources',
  })
  .addTag('Bookings', 'Create and manage trip bookings', undefined, {
    parent: 'Resources',
  })
  .build();
OpenAPI 3.2 improves the Tag Object so tags can be organized into a hierarchy with the parent property, and annotated with a kind property. The kind property is a free-form, machine-readable string that hints how the tag should be used by various tools, but the common usage is: nav, badge, or audience.
The generated OpenAPI document should then look a bit like this.
tags:
  - name: Resources
    description: Top-level navigation tag for related resources
    kind: nav
  - name: Stations
    description: Find and filter train stations
    parent: Resources
  - name: Trips
    description: Timetables and routes for train trips
    parent: Resources
  - name: Bookings
    description: Create and manage trip bookings
    parent: Resources
Then, each controller only needs to reference the matching tag, and the document stays organized with a clear hierarchy.
import {
  // ...
  ApiTags,
} from '@nestjs/swagger';

@ApiTags('Bookings')
@Controller('bookings')
export class BookingsController { }
The controller is tagged with Bookings so all of the routes/operations within it will just share that tag. The generated OpenAPI document will then group all of those routes together under the Bookings section in the Scalar UI, and SDKs will also group methods under that tag.
Add security and Speakeasy retries
After the basic route and schema structure is in place, add the parts that most directly affect SDK behavior: authentication and retry behavior.
Define security schemes in DocumentBuilder:
const config = new DocumentBuilder()
  .addBearerAuth(
    {
      type: 'http',
      scheme: 'bearer',
      bearerFormat: 'JWT',
      description: 'Bearer token authentication',
    },
    'BearerAuth',
  )
  .addOAuth2(
    {
      type: 'oauth2',
      flows: {
        authorizationCode: {
          authorizationUrl: 'https://auth.example.com/oauth2/authorize',
          tokenUrl: 'https://auth.example.com/oauth2/token',
          scopes: {
            'bookings:read': 'Read bookings',
            'bookings:write': 'Create and update bookings',
          },
        },
      },
    },
    'OAuth2',
  )
  .build();
Apply those schemes at the controller level:
import { ApiBearerAuth, ApiOAuth2 } from '@nestjs/swagger';

@ApiBearerAuth('BearerAuth')
@ApiOAuth2(['bookings:read', 'bookings:write'], 'OAuth2')
@Controller('bookings')
export class BookingsController {}
Add Speakeasy retry behavior globally:
const config = new DocumentBuilder()
  .addExtension('x-speakeasy-retries', {
    strategy: 'backoff',
    backoff: {
      initialInterval: 500,
      maxInterval: 60000,
      maxElapsedTime: 3600000,
      exponent: 1.5,
    },
    statusCodes: ['5XX'],
    retryConnectionErrors: true,
  })
  .build();
Override retries for one operation when needed:
@Post('bookings')
@ApiTags('Bookings')
@ApiOperation({ summary: 'Create a booking' })
@ApiBody({ type: CreateBookingDto })
@ApiCreatedResponse({ type: Booking })
@ApiExtension('x-speakeasy-retries', {
  strategy: 'backoff',
  backoff: {
    initialInterval: 1000,
    maxInterval: 80000,
    maxElapsedTime: 3600000,
    exponent: 1.5,
  },
  statusCodes: ['5XX'],
  retryConnectionErrors: true,
})
createBooking(@Body() payload: CreateBookingDto): Booking {
  return this.trainService.createBooking(payload);
}
Generate SDKs from the OpenAPI document
With the OpenAPI document exported to openapi.yaml, use it to generate SDKs with Speakeasy.
The generated file contains OpenAPI 3.2 metadata, resource-based route paths, route parameters derived from DTOs, security requirements, and component schemas generated from entities.
Example output:
openapi: 3.2.0

paths:
  /stations:
    get:
      operationId: getStations
      tags:
        - Resources
        - Stations

  /trips:
    get:
      operationId: getTrips
      parameters:
        - name: origin
          required: true
          in: query
          schema:
            type: string
            format: uuid

components:
  securitySchemes:
    OAuth2:
      type: oauth2
      flows:
        authorizationCode:
          authorizationUrl: https://auth.example.com/oauth2/authorize
          tokenUrl: https://auth.example.com/oauth2/token
          scopes:
            'bookings:read': Read bookings
            'bookings:write': Create and update bookings

  schemas:
    Station:
      type: object
      properties:
        id:
          type: string
          format: uuid
        name:
          type: string
Generate an SDK:
speakeasy quickstartOr run Speakeasy directly:
speakeasy generate sdk --schema ./openapi.yaml --lang typescript --out ./sdk-typescriptValidate the document
Lint the generated OpenAPI file:
speakeasy lint openapi --schema ./openapi.yamlExample SDK usage
After generating a TypeScript SDK, call operations using methods named from operationId values.
The createBooking SDK call uses the same request body shape as the NestJS controller. The camelCase field names come from the generated SDK, while the payload still maps cleanly to the CreateBookingDto schema.
import { SDK } from './sdk-typescript/src';
import { getStations, createBooking } from './sdk-typescript/src/funcs';

const sdk = new SDK();

async function run() {
  const stations = await getStations(sdk, { search: 'Berlin' });
  if (!stations.ok) throw stations.error;

  const booking = await createBooking(sdk, {
    tripId: 'ea399ba1-6d95-433f-92d1-83f67b775594',
    passengerName: 'Alex Rider',
    hasBicycle: false,
    hasDog: true,
  });
  if (!booking.ok) throw booking.error;

  console.log(booking.value);
}

run();
Add SDK Generation to GitHub Actions
The Speakeasy sdk-generation-action repository provides workflows that can integrate the Speakeasy CLI in a CI/CD pipeline, so SDKs are regenerated when the OpenAPI document changes.
Set up Speakeasy to automatically push a new branch to SDK repositories so that engineers can review and merge the SDK changes.
For an overview of how to set up automation for your SDKs, see the Speakeasy documentation about SDK Generation Action and Workflows.
Further reading
Learn more about the OpenAPI decorators available in @nestjs/swagger on NestJS’s OpenAPI integration here .
Last updated on